This workshop takes the official Flutter + Genkit starter kit and sets up a Firebase Studio environment to run it and explore it.
About Genkit
Genkit is an open-source toolkit designed to help you build AI-powered features in web and mobile apps. Its primary strength is its versatility and flexibility. Genkit offers a unified interface for integrating AI models from Google, OpenAI, Anthropic, Ollama, and more, so you can explore and choose the best models for your needs.
Genkit is a server-side toolkit, so you can make changes on the fly and end-users won't notice as long as the client-facing APIs stay the same. Additionally, because Genkit flows are deployed as standard HTTPS endpoints - either on a server or serverless - Genkit flows can be reachable by any client that can make a network call.
Finally, it also comes with support for a number of popular server-side languages: JavaScript, Python, and Go.
Whether you're building chatbots, intelligent agents, workflow automations, or recommendation systems, Genkit handles the complexity of AI integration so you can focus on creating incredible user experiences.
The Packing List App
Stressed about packing? Forget essentials? Wish someone could just do it for you? Say hello to My Packing List!
Tell the app:
- Where you're going.
- How long you'll be there.
- Any attire needs (like "business formal" or "beach casual").
Our smart agent fetches the latest weather forecast for your destination and generates a personalized packing list tailored precisely to your trip!
But wait, there's more!
- Interactive Checklist: Easily track what you already have packed. Customizable prompts and tools.
- One-Tap Shopping: Missing a few items? Tap the "Buy Missing Items" button, and the agentic app handles the shopping for you! (Note: This demo simulates the shopping bit. Sorry, you won't be getting any Hawaiian shirts from building this app.)
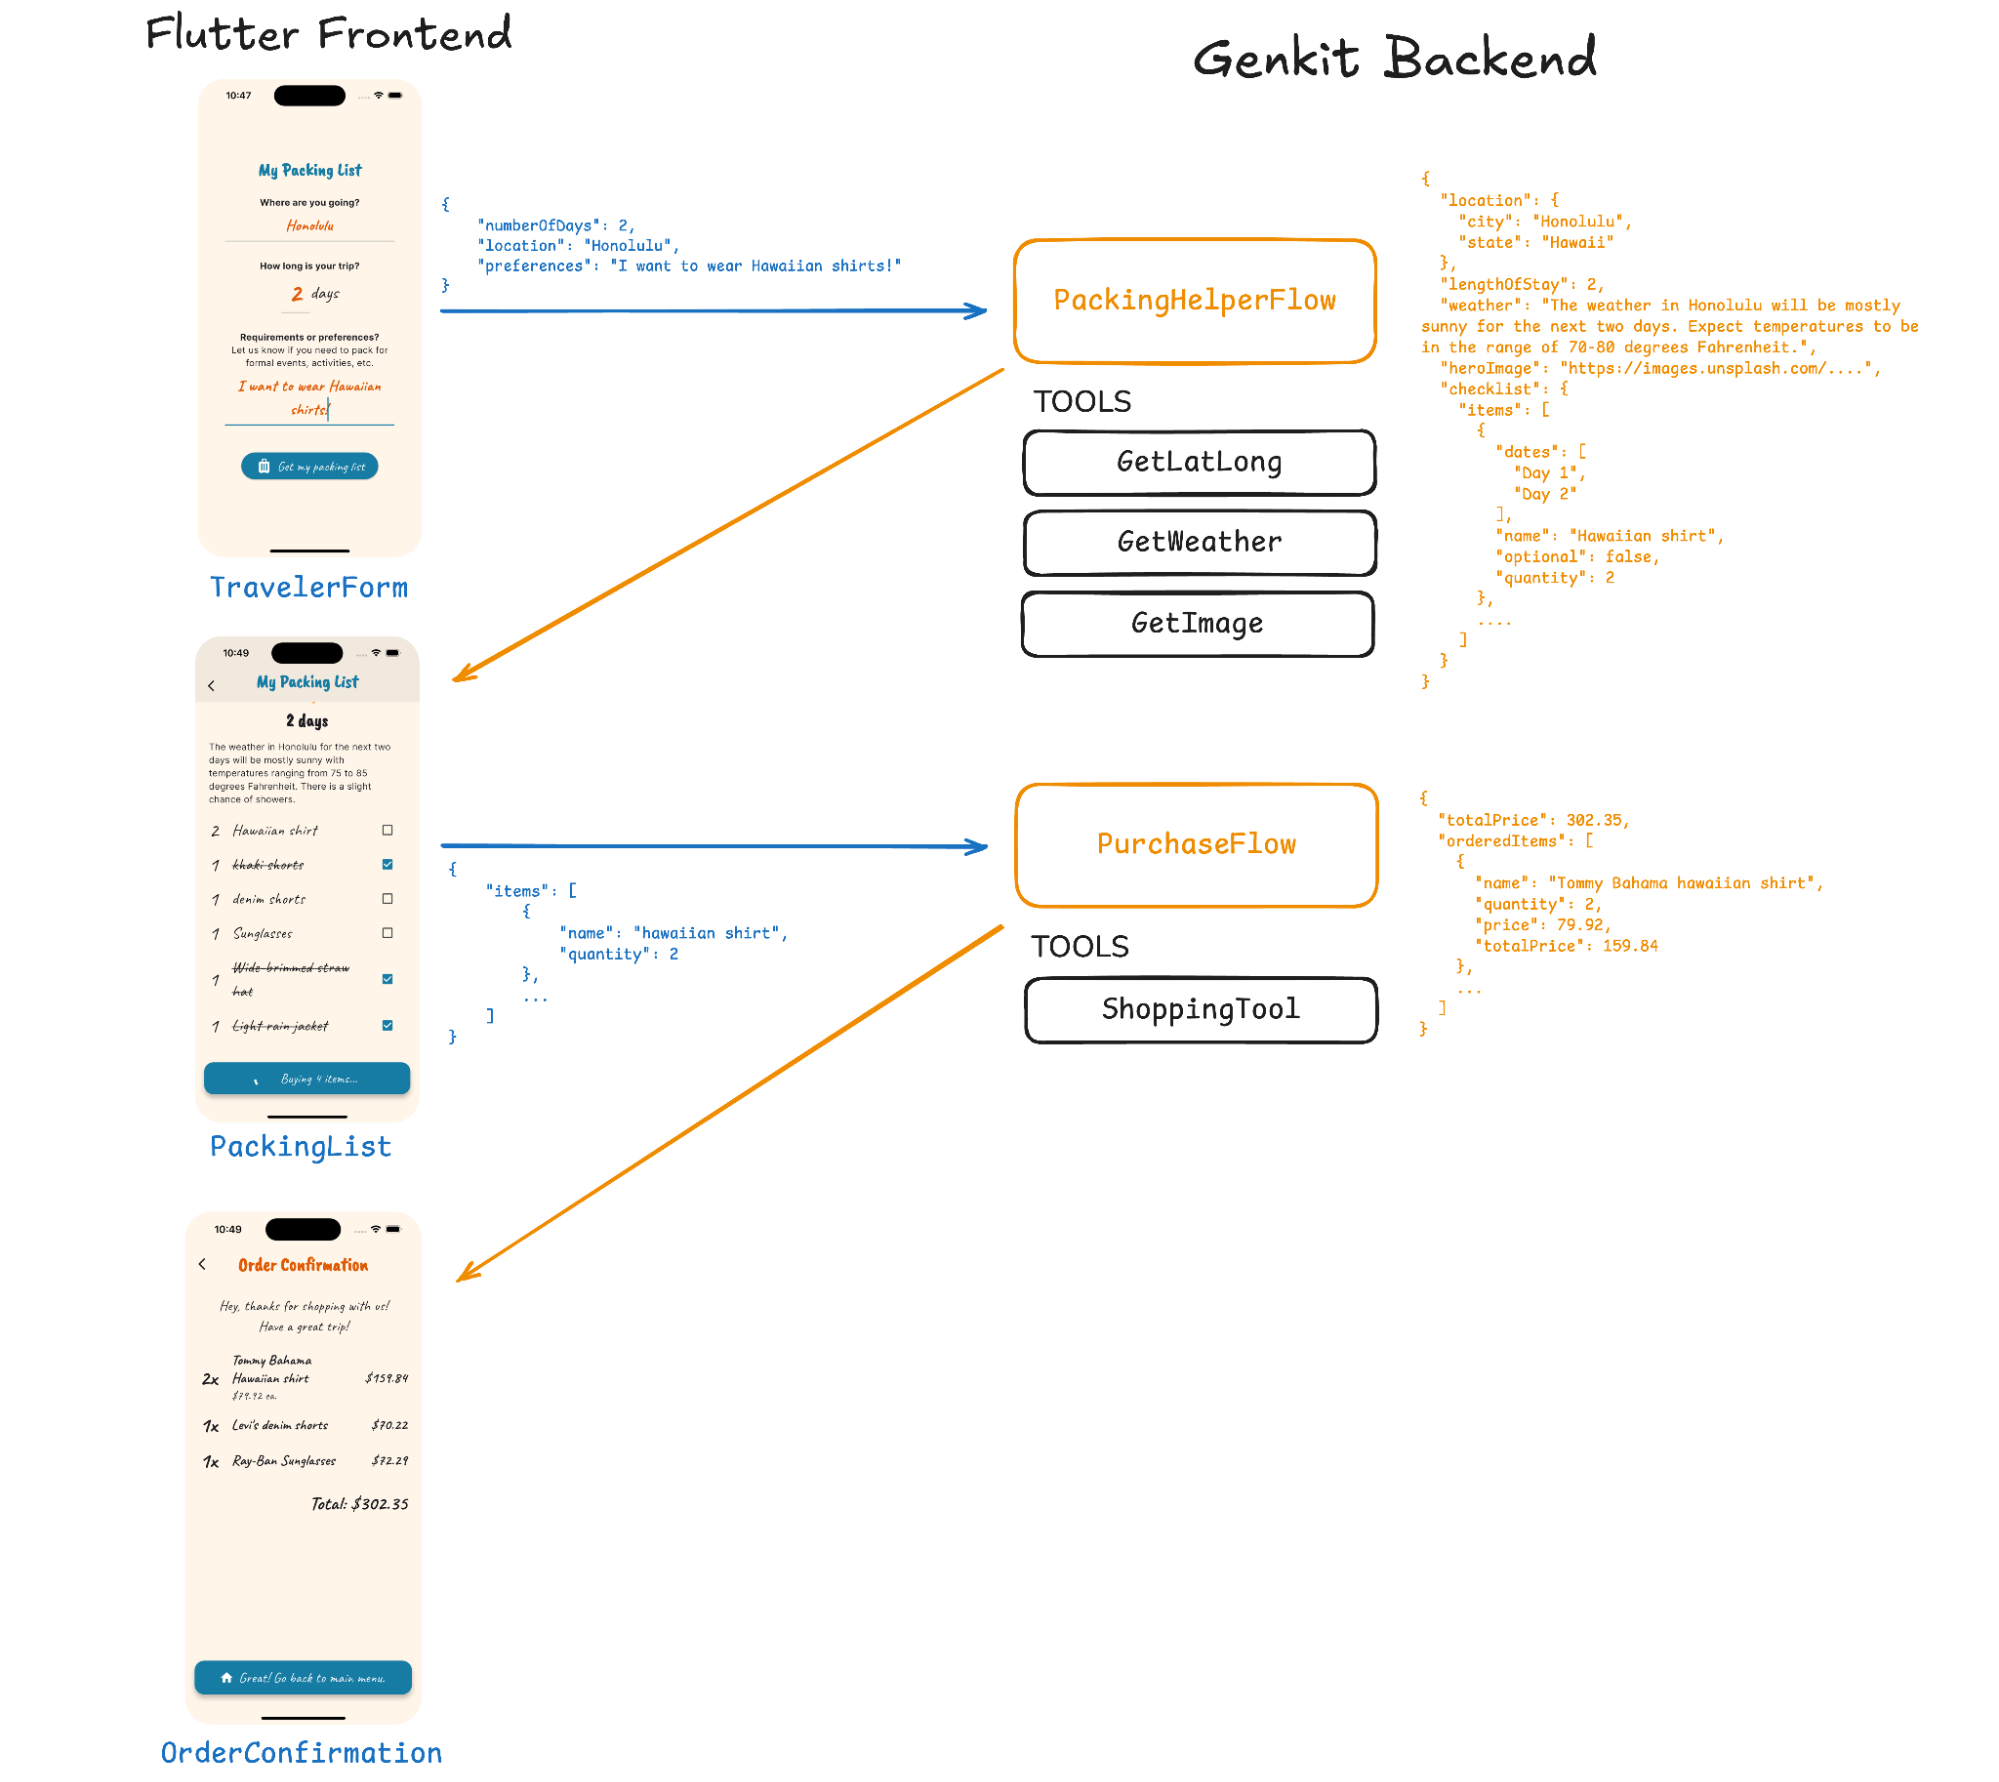
How Flutter and Genkit work together
First, Flutter
This is the app that developers will build and interact with. The diagram shows screens for retrieving information and presenting users with information, filling out a packing list, and asking the agent to complete a purchase.
Now, Genkit
This is where the "brains" of the app lives. When the Flutter app sends a request with some data to the Genkit backend, it's sent to a specific "flow" to handle the tasks. The flow processes the data and sends back a response to the Flutter app. Tools are specialized helpers that a language model can use to perform specific tasks to accomplish its goal. Language models are limited in knowledge to their training data, so tools give them the ability to interact with things with the "outside world." Such as, retrieving real-time data or executing an action. Tools are often wrappers around other APIs and functions.
Let's get started!
Before we start, we need to get a few things. Our app will make calls to three external services, and we need API keys for each one of them:
- Gemini: To access the Gemini models.
- OpenWeatherMap: To get a weather forecast (used by the
LatLongandWeathertools in our project) - Unsplah: To gather images for our app (used by the
Unsplashtool)
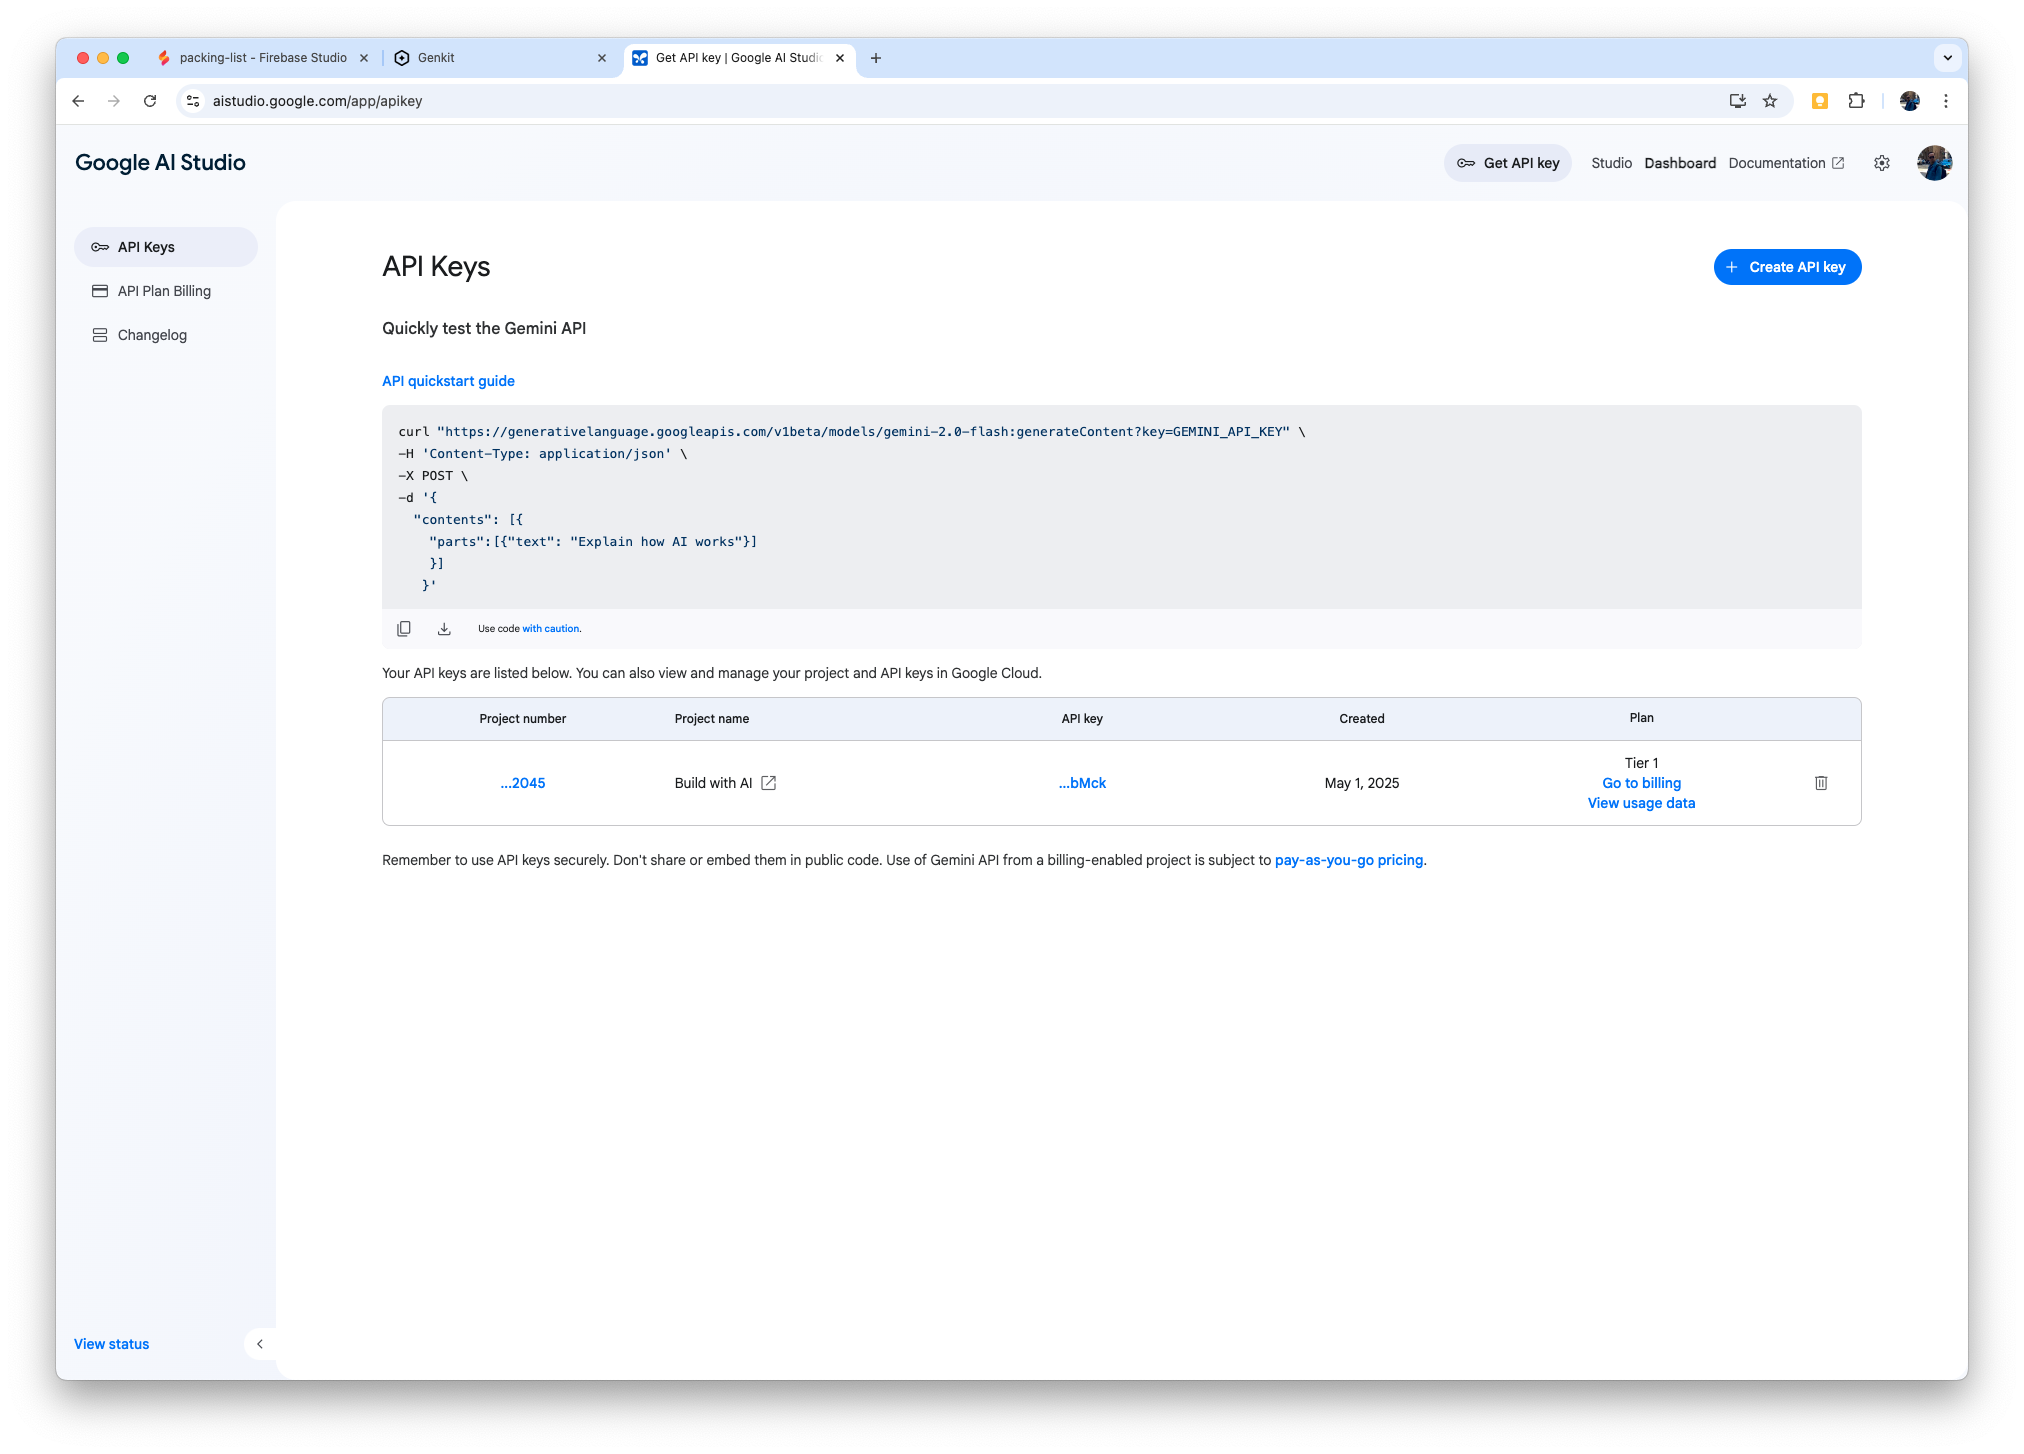
Gemini API Key

Navigate to AI Studio:
https://aistudio.google.com/app/apikey
Create a new API Key and save the value somewhere on your computer; we will use it in the next section.
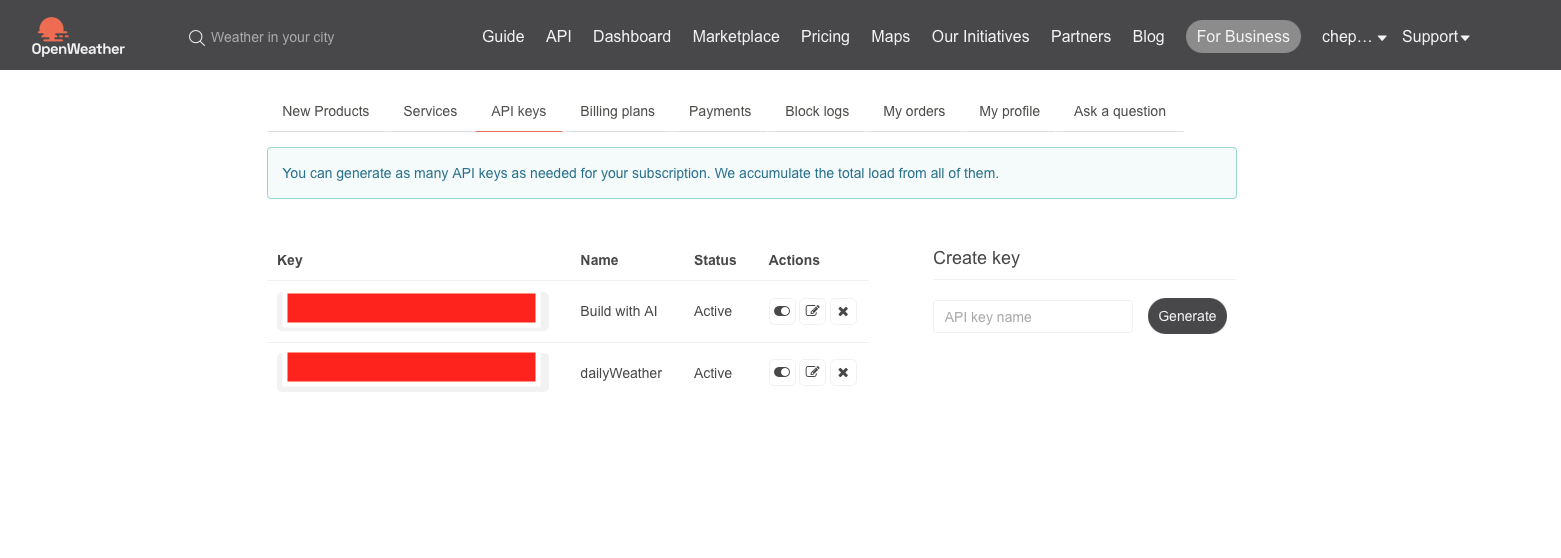
OpenWeatherMap API Key
Go to OpenWeather and create an account if you don't have it. There, create a new API key and save the value.
Unsplash
Finally, navigate to Unsplash and create a new Application. Scroll down in the applications details page and record the Access Key.
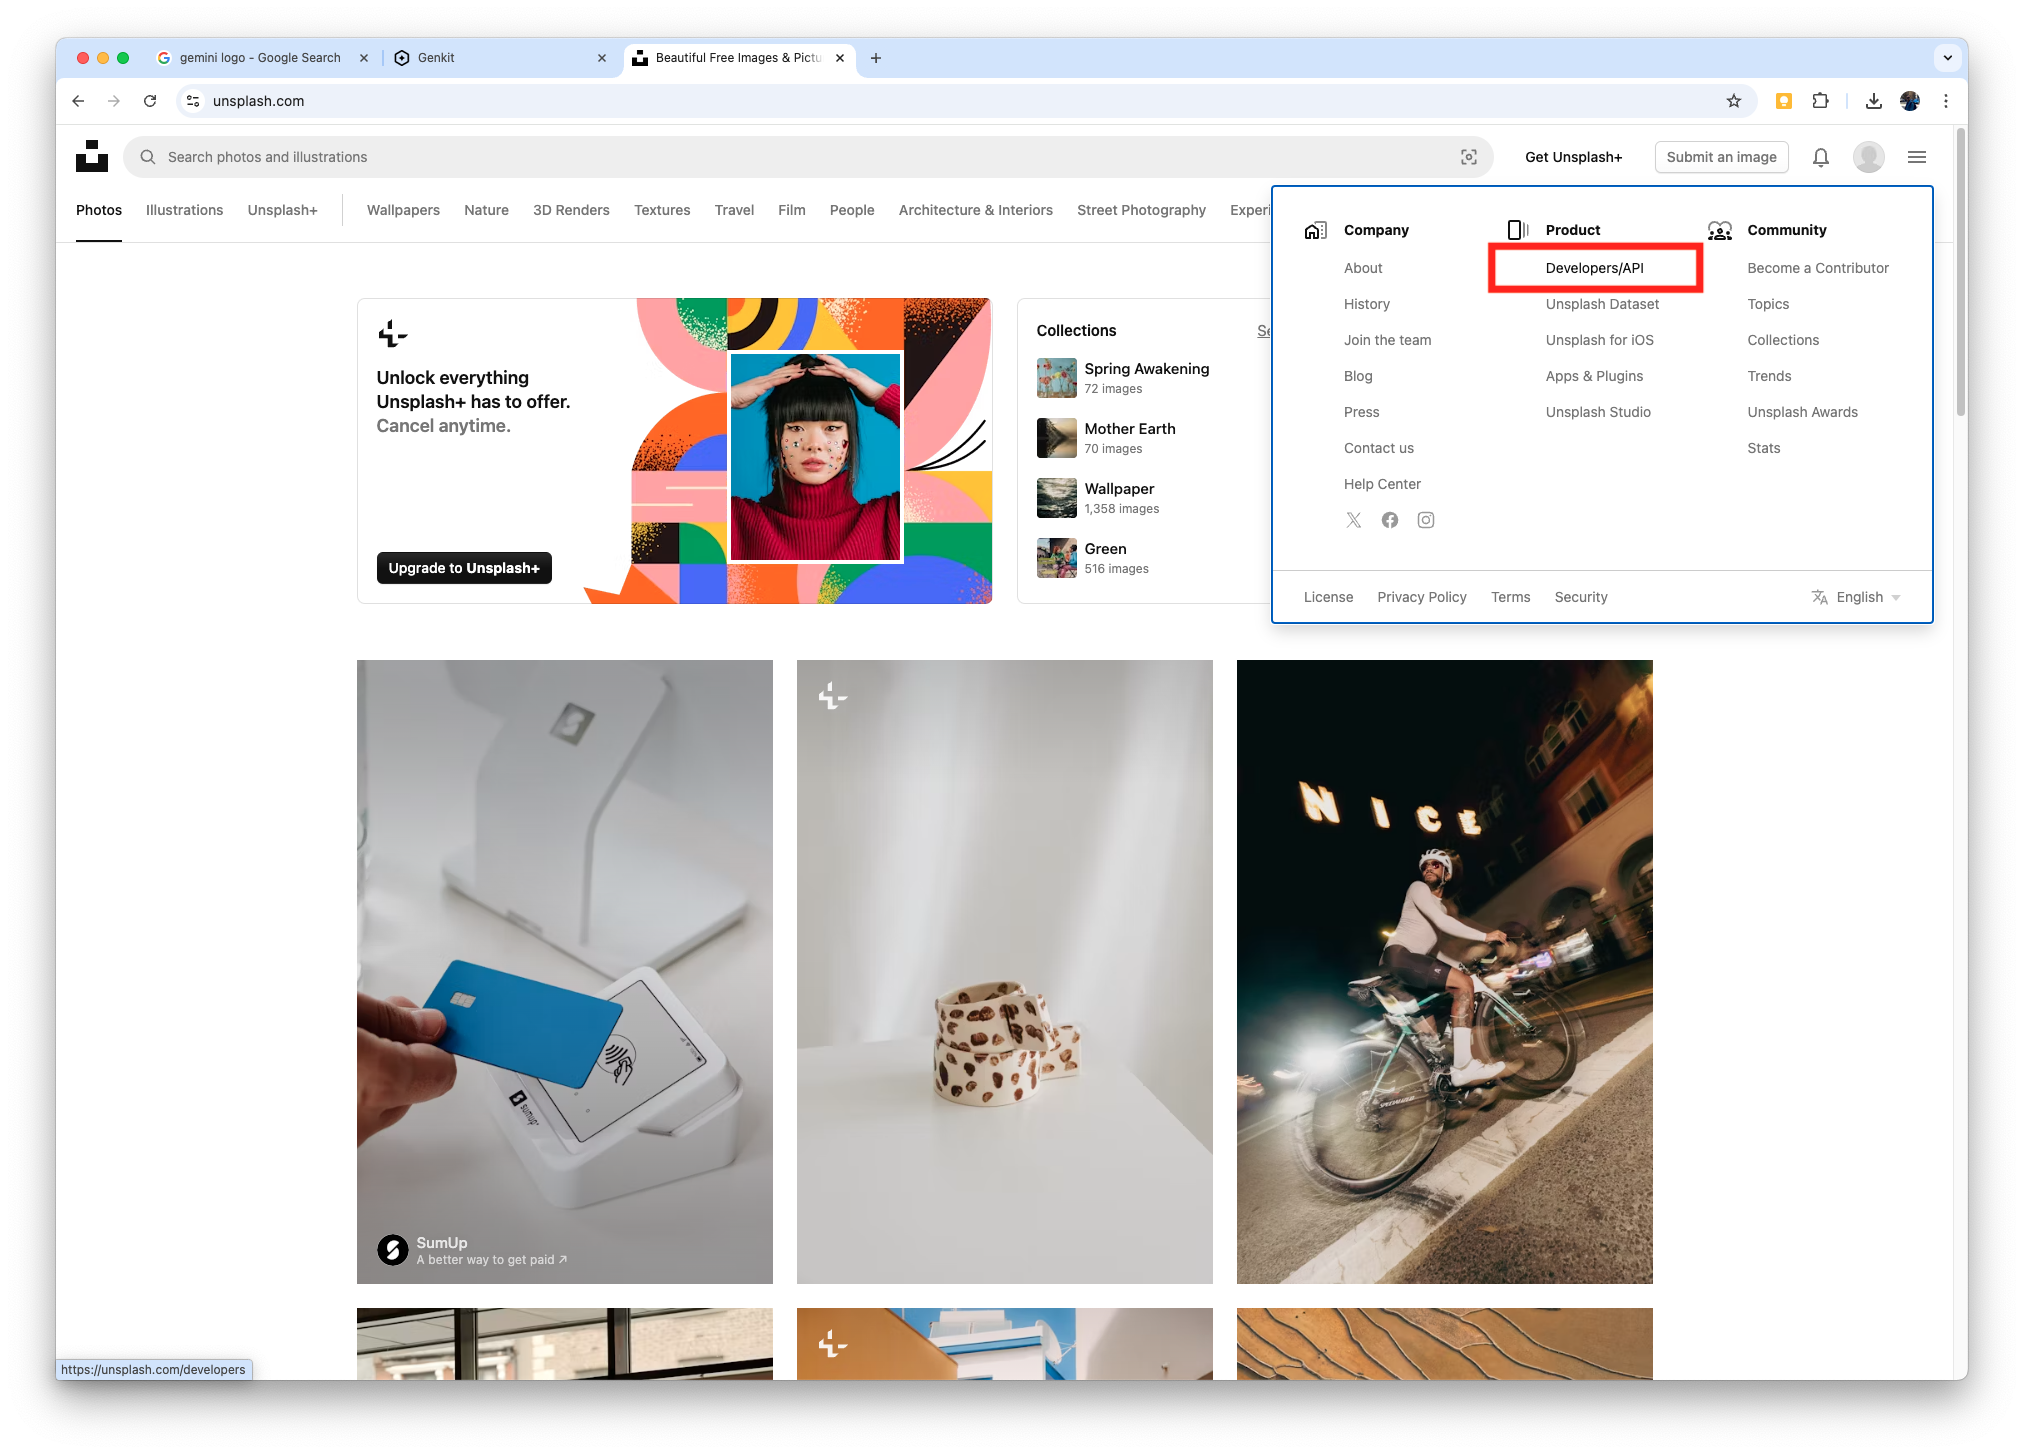
Take note of the Access Key:

With all the API Keys that we need, we can go to Firebase Studio and start working on the App.

Firebase Studio is a cloud-based, AI-powered development environment from Google that simplifies and accelerates the process of building and deploying full-stack AI apps. It offers a unified platform with AI agents, emulators, testing frameworks, and more, all accessible through a browser-based interface.
AI-Powered Development:
Firebase Studio leverages Gemini, Google's AI model, to assist in the development process, including code generation, debugging, and more.
Full-Stack Support:
It supports building various app components, including APIs, backends, frontends, and mobile apps.
Agile and Collaborative:
The cloud-based environment allows for easy collaboration and sharing of code and resources.
Flexible and Customizable:
You can start with AI-generated code or import existing projects, and the environment can be customized to fit your specific needs.
Streamlined Workflow:
Firebase Studio aims to streamline the entire development lifecycle, from prototyping to deployment, all in one place.
In essence, Firebase Studio aims to empower developers with the tools and resources they need to build and deploy AI-powered applications efficiently, whether they are beginners or experienced developers.
Import the Code
Let's go to Firebase Studio and start working on our App.
Once you are ready to start hacking away, you will be greeted by a page like this:
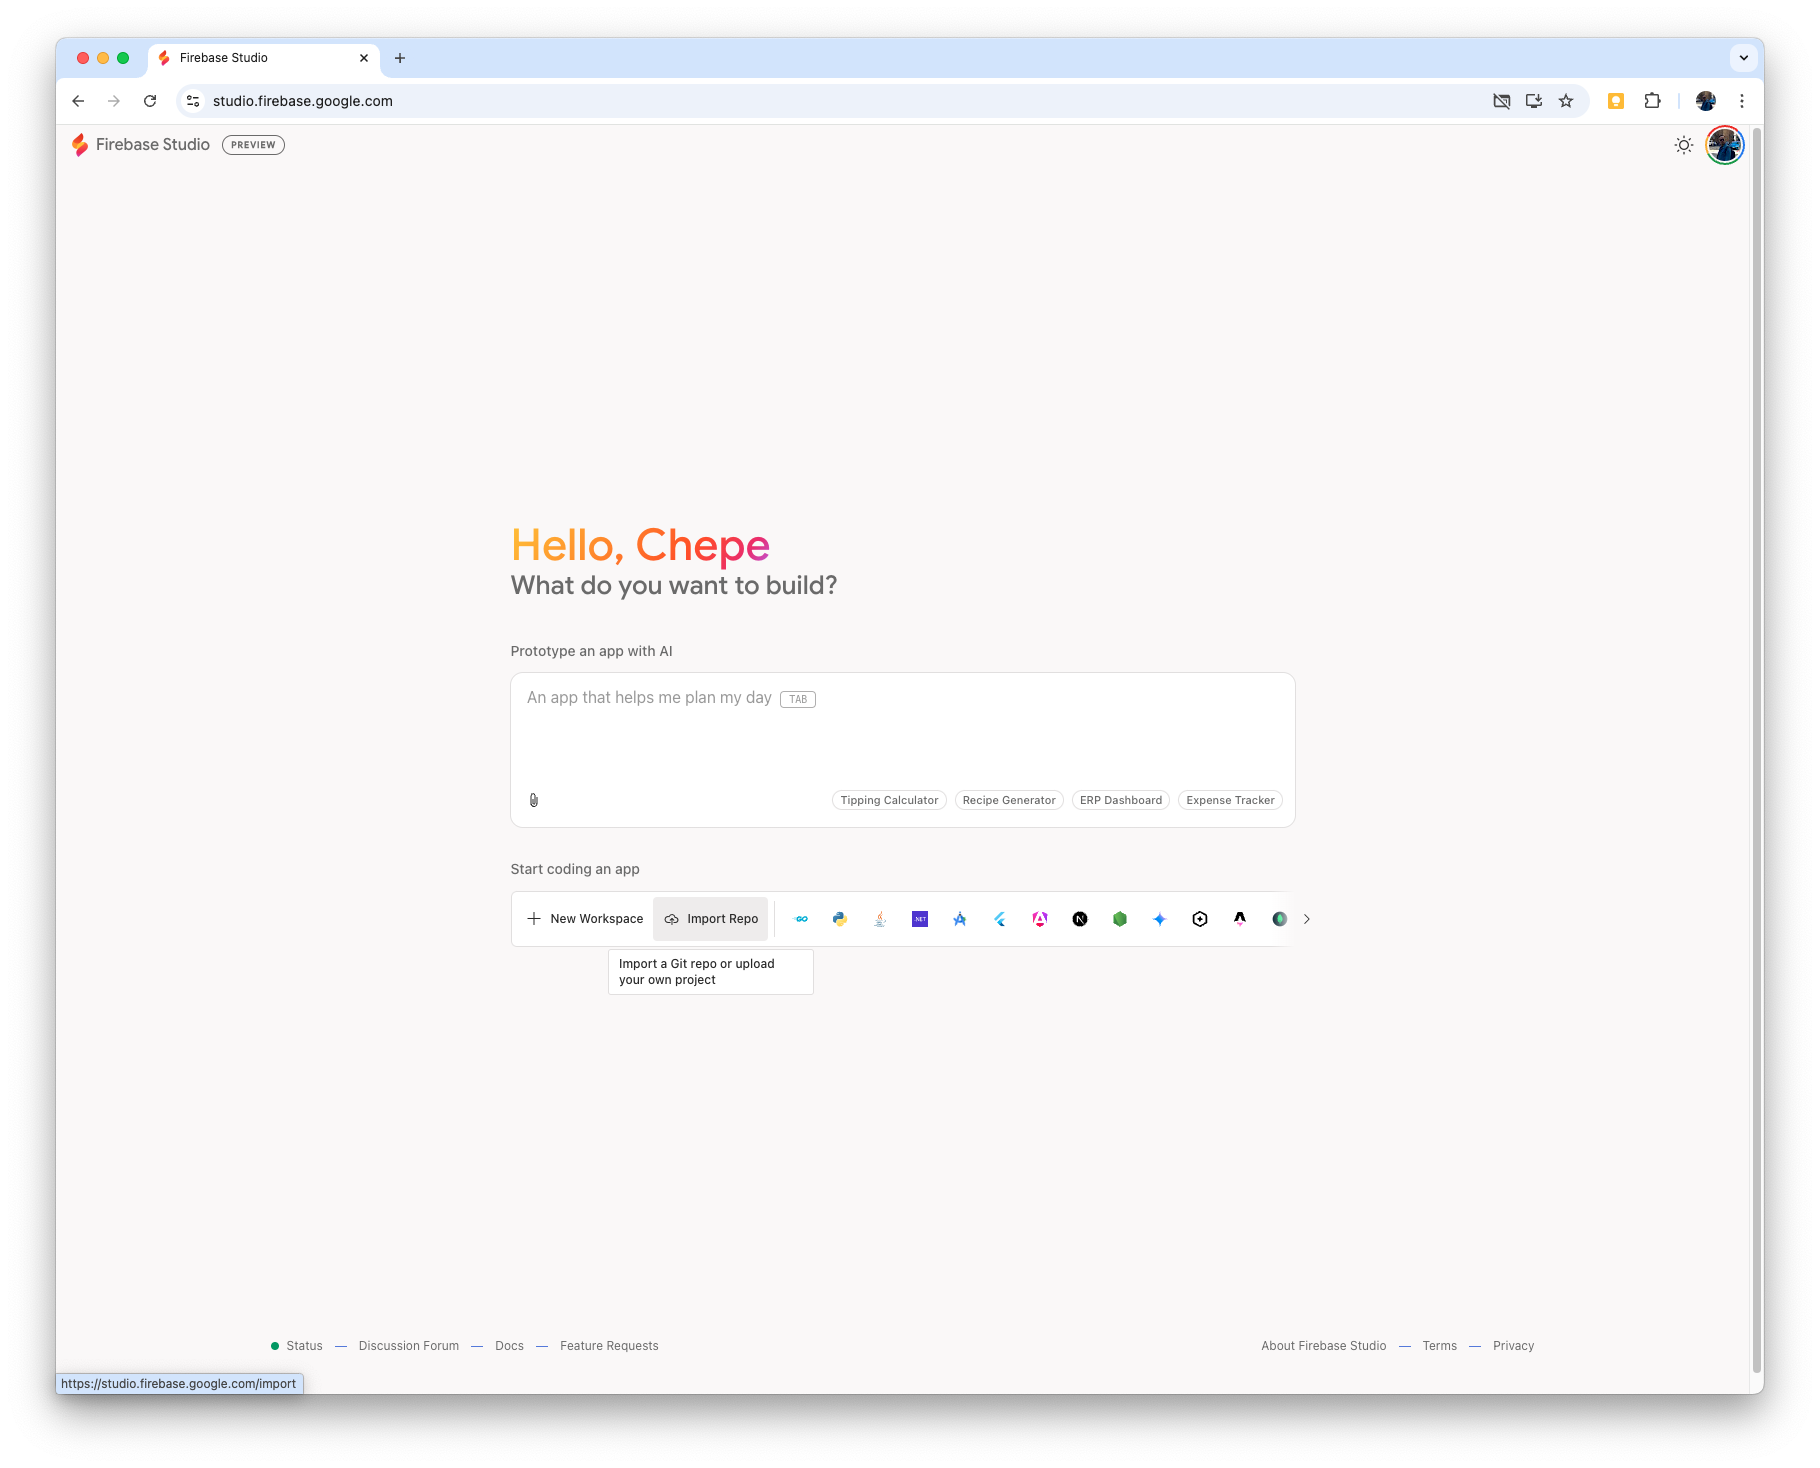 Create a new Workspace by importing the repository. Copy and paste the following URL:
https://github.com/RAD-Ninjas/building-agentic-apps.git
Make sure to check the This is a Flutter App checkbox.
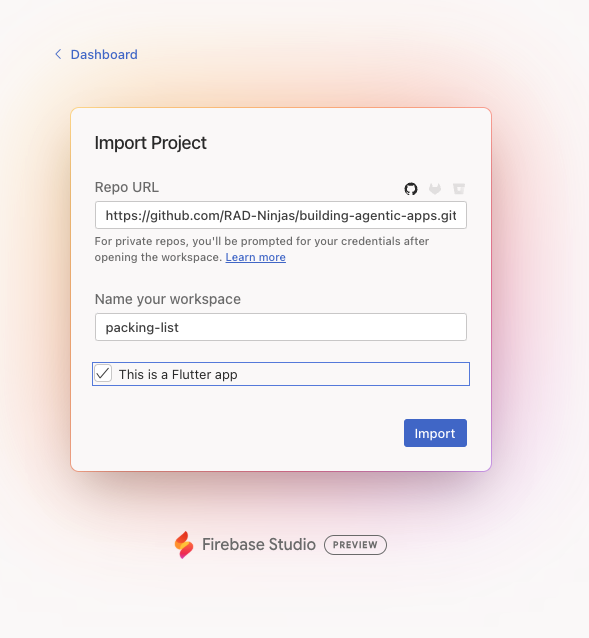
After clicking Import, a new instance of Flutter Studio will be provisioned for you.
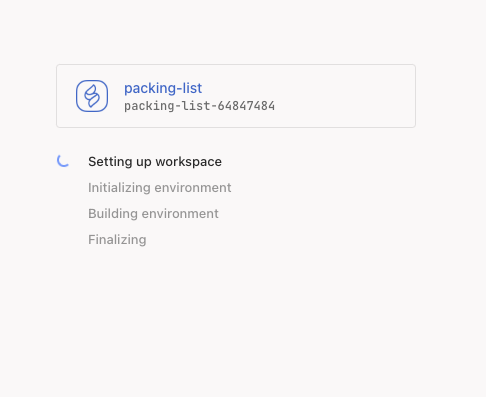
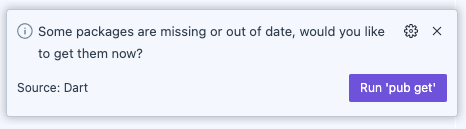
Some things need to be configured the first time we go into Firebase Studio, so give it a little time. You will see pop-up come up in the bottom right corner asking you to run flutter pub get --no-example. Click on the corresponding bottom to install the dependencies for your Flutter App.
Some other things are being configured in the background, you'll know when it's done because the app will start inside the Android Preview.
You can interact with the app now, but you'll notice that it shows an error when you click the Get My Packing List button.
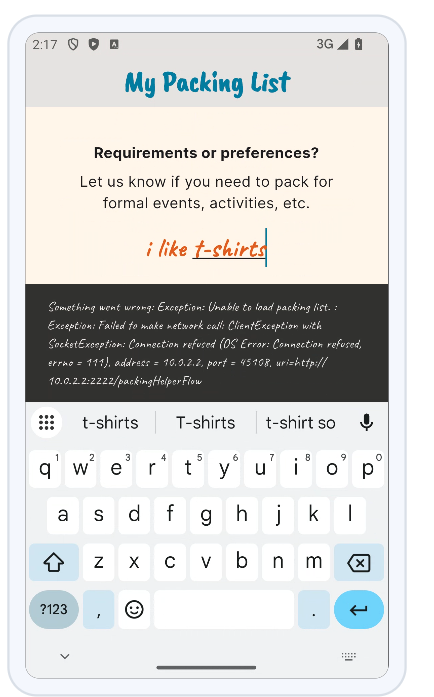
This is because we need to start the Genkit backend, so let's do that in the next section.
Remember all those API keys that you got at the beginning of this tutorial? Now is the time to use them. From the file explorer on the left, open the file called .idx/dev.nix
This file contains the configuration of your Firebase Studio environment. It tells Firebase Studio what needs to be done when the environment is created; everytime it starts, etc.
There is a section that looks like this:
env = {
    GEMINI_API_KEY = "";
    OPEN_WEATHER_API_KEY = "";
    UNSPLASH_ACCESS_KEY = "";
    PORT = "8080";
  };
Put the value for each of your API keys in the corresponding variable (don't forget the double quotes and the semicolon at the end so it looks like API_KEY_VAR_NAME: "THE-API-KEY-HERE";).
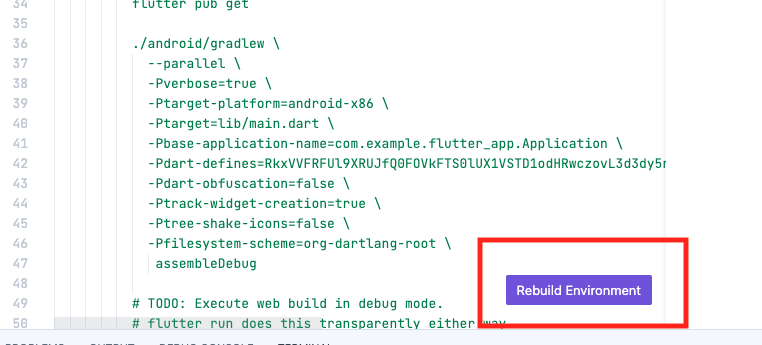
Notice how everytime you make a change to this file, a Rebuild Environment button appears in the bottom right corner of the editor. Once you're done setting your API keys, click it to rebuild your Firebase Studio Environment.
Starting the Backend Service
Once you are back into Firebase Studio we can start the backend service. For that, we will need to use a terminal.
Navigate to the correct directory and start the Genkit backend for the first time. Copy and paste the code below into the terminal:
cd genkit_flutter_agentic_app/genkit_backend

npx genkit start -o -- node src/app.js
The first time you start the Genkit server, it will let you know that it uses cookies and ask you to hit ENTER. This only needs to be done once. 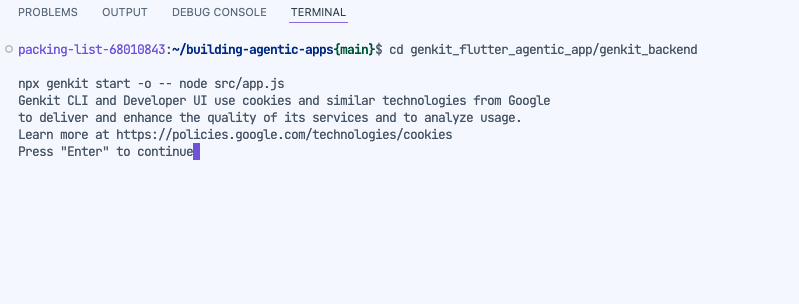
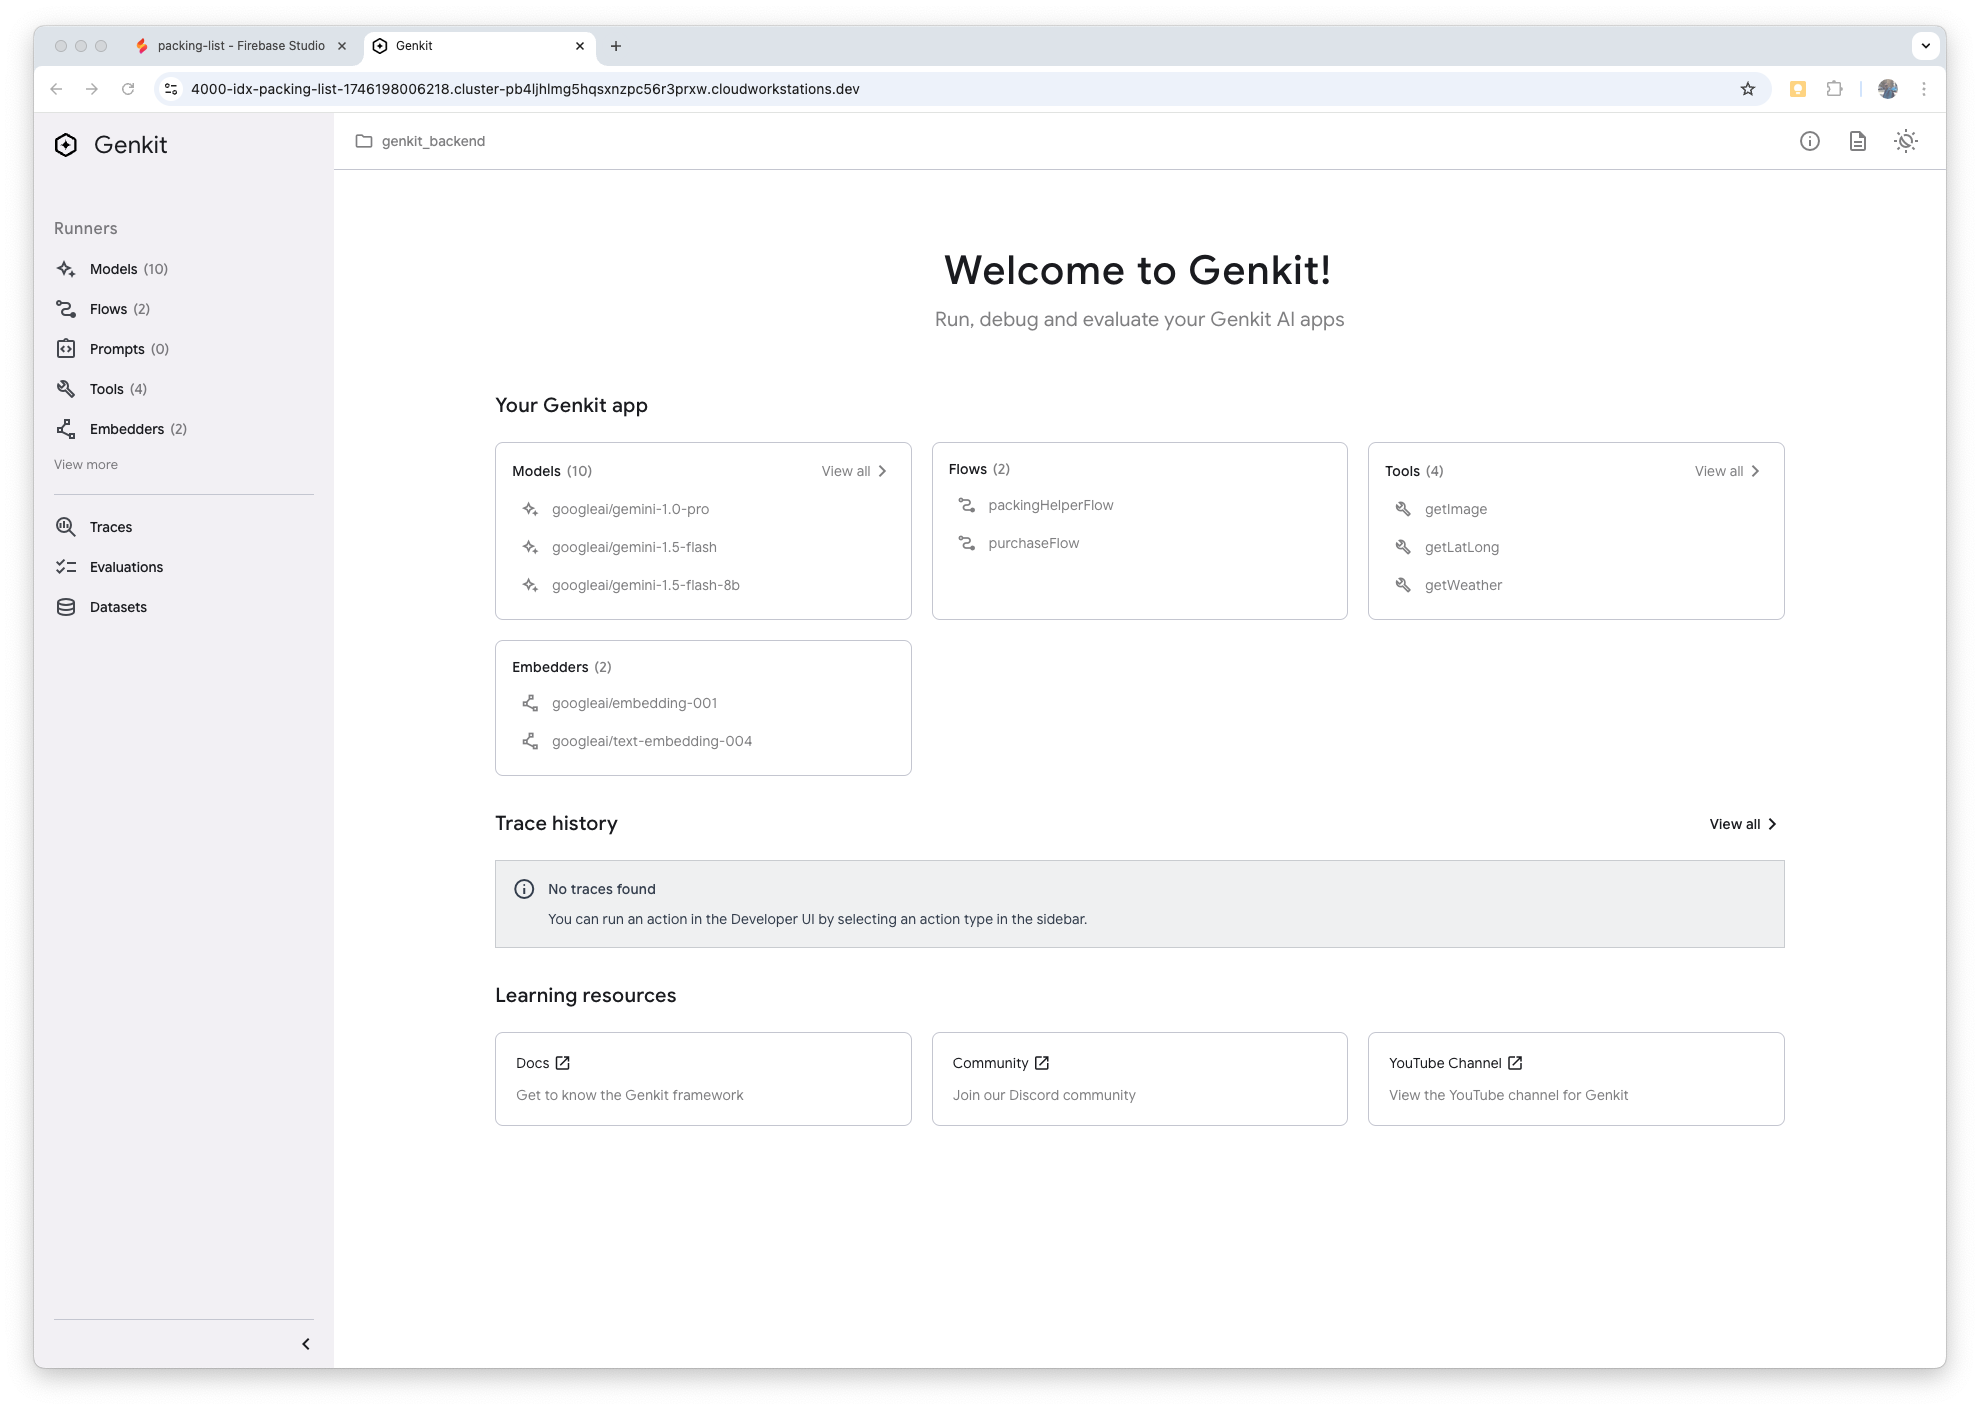
After you hit ENTER, the Genkit server will start and a new tab will open in your browser. This is the Genkit Developer UI and it is super useful. We will come back to explore this in a later section.
Now that our backend is working, we can configure our environment so it runs automatically every time we open the workspace. Go to the .idx/dev.nix file again, and uncomment the section for the onStart hook. The whole workspace section should look like this:
 workspace = {
      # Runs when a workspace is first created with this `dev.nix` file
      onCreate = {
        install-genkit-dependencies = ''
          cd genkit_flutter_agentic_app/genkit_backend
          npm install
        '';
      };

      onStart = {
        start-genkit = ''
          cd genkit_flutter_agentic_app/genkit_backend

          npx genkit start -o -- node src/app.js
        '';
      };

      # To run something each time the workspace is (re)started, use the `onStart` hook
    };
After you've updated the configuration file, click on Rebuild Environment and once we're back into Firebase Studio we'll be ready to explore the Flutter App in the next section.
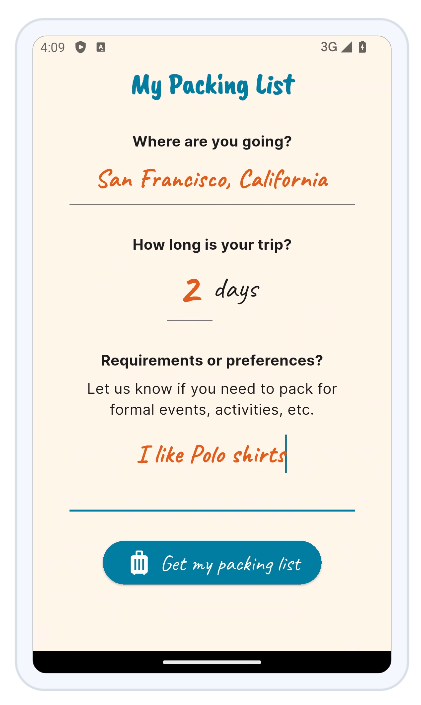
Flutter: The Traveler Form
This is the first screen you are presented with, and the intention here is to tell the app where you want to go, for how many days and what are your clothing preferences.
The code for this screen is in genkit_flutter_agentic_app/flutter_frontend/lib/screens/traveler_form/traveler_form_screen.dart
Even though this is a very basic screen, it is where the magic starts. When you hit the Get My Packing List button at the bottom of the screen, data is validated and the PackingHelperFlow is invoked.
Genkit: The Packing Helper Flow
When this flow is invoked, some information from the user is received:
- The destination, using a
City,Stateformat. - The number of days.
- The attire preferences.
Using these three pieces of information, the AI will create the necessary packing list for our trip.
The first step is to get a weather forecast for several days, and for that we need two endpoints from Open Weather Map. Each of these endpoints is a tool that the agent can use, let's explore how all of this works: First, here is the code for getting the weather (genkit_flutter_agentic_app/genkit_backend/src/flows/packingHelper.js):
 const weatherResponse = await ai.generate({
    prompt: `Get the weather forecast for the next ${input.numberOfDays} days in this location: ${input.location}.`,
    input: {
        schema: z.object({
            'numberOfDays':
                z.number().describe('Number of days to get the weather forecast for'),
            'location':
                z.string().describe('The location to get the weather forecast for'),
        }).describe('Input to get the weather forecast'),
    },
    tools: [getWeatherTool, getLatLongTool],
    model: gemini20Flash,
    output: {
        schema: WeatherSchema,
    },
});
Notice how the prompt only provides a simple instruction with the number of days and the location. However, let's look at the tool definitions to understand how they work: The first tool is the latlong tool (genkit_flutter_agentic_app/genkit_backend/src/tools/latlong.js). It gets the correct coordinates for the destination:
const getLatLongTool = ai.defineTool({
    name: 'getLatLong',
    description: 'Use this tool to get the latitude and longitude for a location.',
    inputSchema: z.object({
        "location": z.string()
            .describe('The name of a place in the format of: City,State or Province. For example: Sunnyvale,California, Washington,DC, Honolulu,Hawaii ')
    }),
    output: {
        schema: z.object({
            lat: z.number().describe("The latitude of the location"),
            long: z.number().describe("The longitude of the location")
        })
    },
}, async (input) => await getLatLong(input.location));
This is needed because to get a weather forecast for several days, we can't use the name of the city, we need its coordinates. Now let's take a look at the weather (genkit_flutter_agentic_app/genkit_backend/src/tools/weather.js) tool:
export const getWeatherTool = ai.defineTool({
    name: 'getWeather',
    description: 'Use this tool to get the weather forecast for the next {{number of days}} in {{location specified by latitude and longitude}}.',
    inputSchema: z.object({
        lat: z.number().describe('The latitude of the location to get the weather forecast.'),
        long: z.number().describe('The longitude of the location to get the weather forecast.'),
        days: z.number().describe('Number of days to get the weather forecast'),
    }),
    output: {
        schema: z.array(
            z.object({
                day: z.string().describe('Date of the forecast in the format of: Day, Month Date, Year'),
                low: z.number().describe('Low temperature for the day'),
                high: z.number().describe('High temperature for the day'),
                humidity: z.number().describe('Humidity, %'),
                weather_condition: z.string().describe('A brief description of the weather condition, such as cloudy, sunny, rain, snow, etc.')
            },).describe('The weather forecast for a day.'),
        ).describe('The weather forecast for the specified location.')
    },
}, async (input) => await getWeather(input.lat, input.long, input.days));
Once the AI has used both tools to get a weather forecast for the whole trip, it will put together all the outfits that we'll need.
const location = weatherResponse.output.location;
const weather = weatherResponse.output.weatherForecast;

const outfitsResponse = await ai.generate({
    system: 'You are an expert personal stylist. A traveler has asked you to put together outfits for them to wear for an upcoming travel trip. You curate outfits based on the weather and the traveler\'s preferences.',
    prompt: `Using your fashion expertise, please create an itemized list of ${input.numberOfDays} outfits that the user should pack for the weather forecast: ${weather} and matches the traveler's attire preferences: ${input.preferences}.
            Follow these rules:
            - Every outfit needs to have at least a top (tshirt, shirt, sweater.) and bottom (pants, jeans, sweatpants, skirt.) unless the outfit is a dress.
            - Layers of clothes are allowed, so the traveler can wear jackets, cardigans, hoodies, etc.
            - If it's cold or raining, the traveler will need a jacket that can be worn for multiple days.
            - If it's sunny, suggest sunglasses and a hat.`,
    config: {
        maxOutputTokens: 400,
        stopSequences: ['<end>', '<fin>'],
        temperature: 1.2,
        topP: 0.4,
        topK: 50,
    },
    output: { schema: OutfitPlannerSchema },
});
After getting the outfits for each day, we ask the AI to aggregate the items to get the correct count for each one of them.
const outfits = outfitsResponse.output;

const checklistResponse = await ai.generate({
    prompt: `Analyze this list of outfits: ${JSON.stringify(outfits)} and create a consolidated checklist of items that the user needs to pack. Aggregate common items and provide the exact item count needed.`,
    output: { schema: PackingChecklistSchema },
    model: gemini20Flash,
    config: {
        temperature: 1,
    },
});
The final part of this flow is used to customize the next screen. The AI will consume Unsplash to get an image related to our destination and customize the next screen:
The unsplash tool (genkit_flutter_agentic_app/genkit_backend/src/tools/unsplash.js) is defined as:
export const getUnsplashTool = ai.defineTool({
    name: 'getImage',
    description: 'Provide a search query to find an image and get an image URL.',
    inputSchema: z.object({ "query": z.string().describe('A search term to find an image'), }),
    output: {
        schema: z.string().describe('Image URL'),
    },
}, async (input) => await getUnsplashImages(input.query));
And using this tool, the last step of the flow is defined as follows:
const heroImageResponse = await ai.generate({
    prompt: `Get JUST the URL to an image of the travel destination: ${input.location} as a string. Use a search query that wil return an image of a popular tourist attraction in ${location.city},${location.state}. If there is no famous attraction, find an image of the ${location.city} skyline.`,
    tools: [getUnsplashTool],
    model: gemini20Flash,
    output: z.string().describe(`URL to an image of ${input.location}`)
});
With all the information in hand, the packingHelperFlow sends the information to the app, and we can see the result in the next screen.
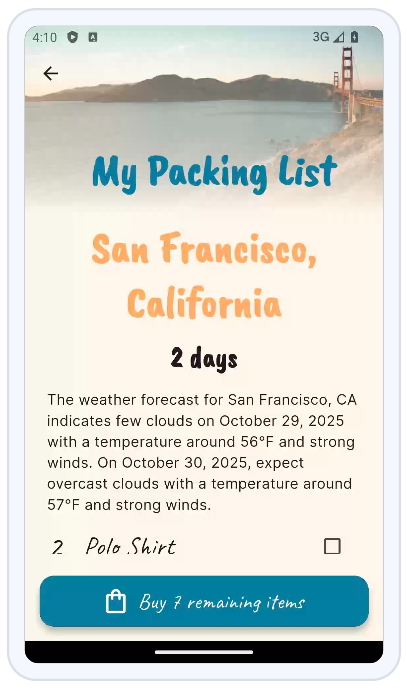
Flutter: The Packing List Screen
When the app receives the packing list, it will show a screen with a checklist that includes everything you need to pack.

Let's look at this screen in more detail. First, notice the image at the top? This is the image that we got from Unsplash, and it's different every time.
Then, we have a description of what the weather will be in human language, this summary was created from the forecast. Below, we have a checklist where the user can select what they have, and leave empty what they want to buy using the button at the bottom.
Notice how, when you click on each item, you can see when you are supposed to wear them, and when you check them, the text gets crossed out. Neat!
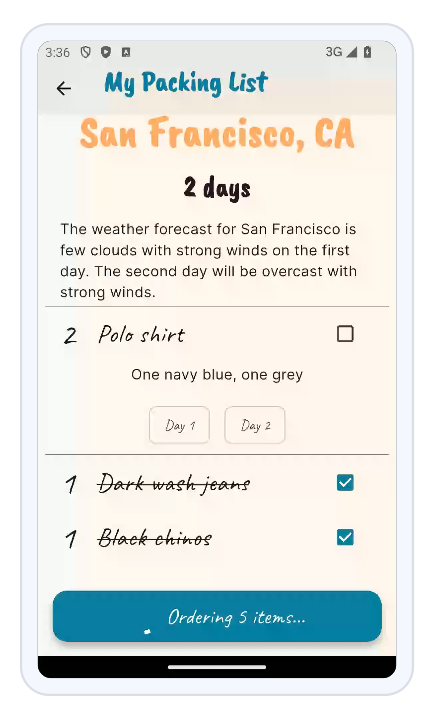
Once you click the BUY button, the purchase flow will start.
Genkit: The Purchase Flow
In this flow, the AI will receive a list of items and search for matching items in the (fake) department store catalog. For this, it will use the shopping tool (genkit_flutter_agentic_app/genkit_backend/src/tools/shopping.js):
export const shoppingTool = ai.defineTool({
    name: 'shoppingTool',
    description: 'Search for an item in the DepartmentStore catalog and buy it.',
    inputSchema: itemToOrder,
    output: { schema: orderedItem }
    }, async (input) => await searchFakeShoppingAPIAndBuy(input.name, input.quantity));
And this tool is used in the purchaseFlow (genkit_flutter_agentic_app/genkit_backend/src/flows/purchase.js):
export const purchaseFlow = ai.defineFlow(
    {
        name: 'purchaseFlow',
        inputSchema: OrderListSchema,
    }, async (input) => {

        var orderedList = [];
        var totalPrice = 0;

        for (var i = 0; i < input.items.length; i++) {
            const purchase = await ai.generate({
                prompt: `
                Follow these instructions:
                1.) Determine ONLY a single popular brand name that sells this item: ${JSON.stringify(input.items[i])}
                2.) Then search the DepartmentStore for this item from the identified popular brand name and buy quantity specified: ${JSON.stringify(input.items[i].quantity)}.`,
                tools: [shoppingTool],
                output: { schema: orderedItem }
            })
            totalPrice += purchase.output.totalPrice;
            orderedList.push(purchase.output);
        }

        return { totalPrice: parseFloat(totalPrice.toFixed(2)), orderedItems: orderedList };
    });
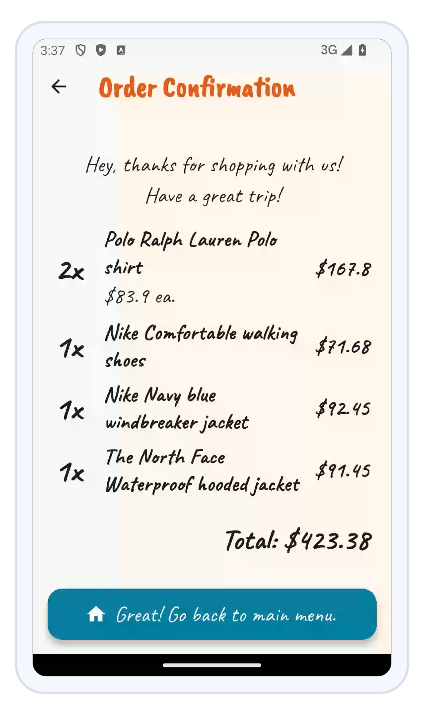
When the Purchase flow completes, we see the final confirmation screen.
This was very fun, but let's explore what the AI did in each step in the following section.
Go to the Genkit Developer UI. If you don't have it open anymore, it is running on port 4000 in your workstation. To get the link that points to that particular port:
- Click on the Firebase Studio icon on the left side of your workspace.
- Expand the
BACKED PORTSsection at the bottom. - Scroll until you find the port
4000and click on the first icon to the right (or click on the second to copy the url and paste it into a new browser tab).
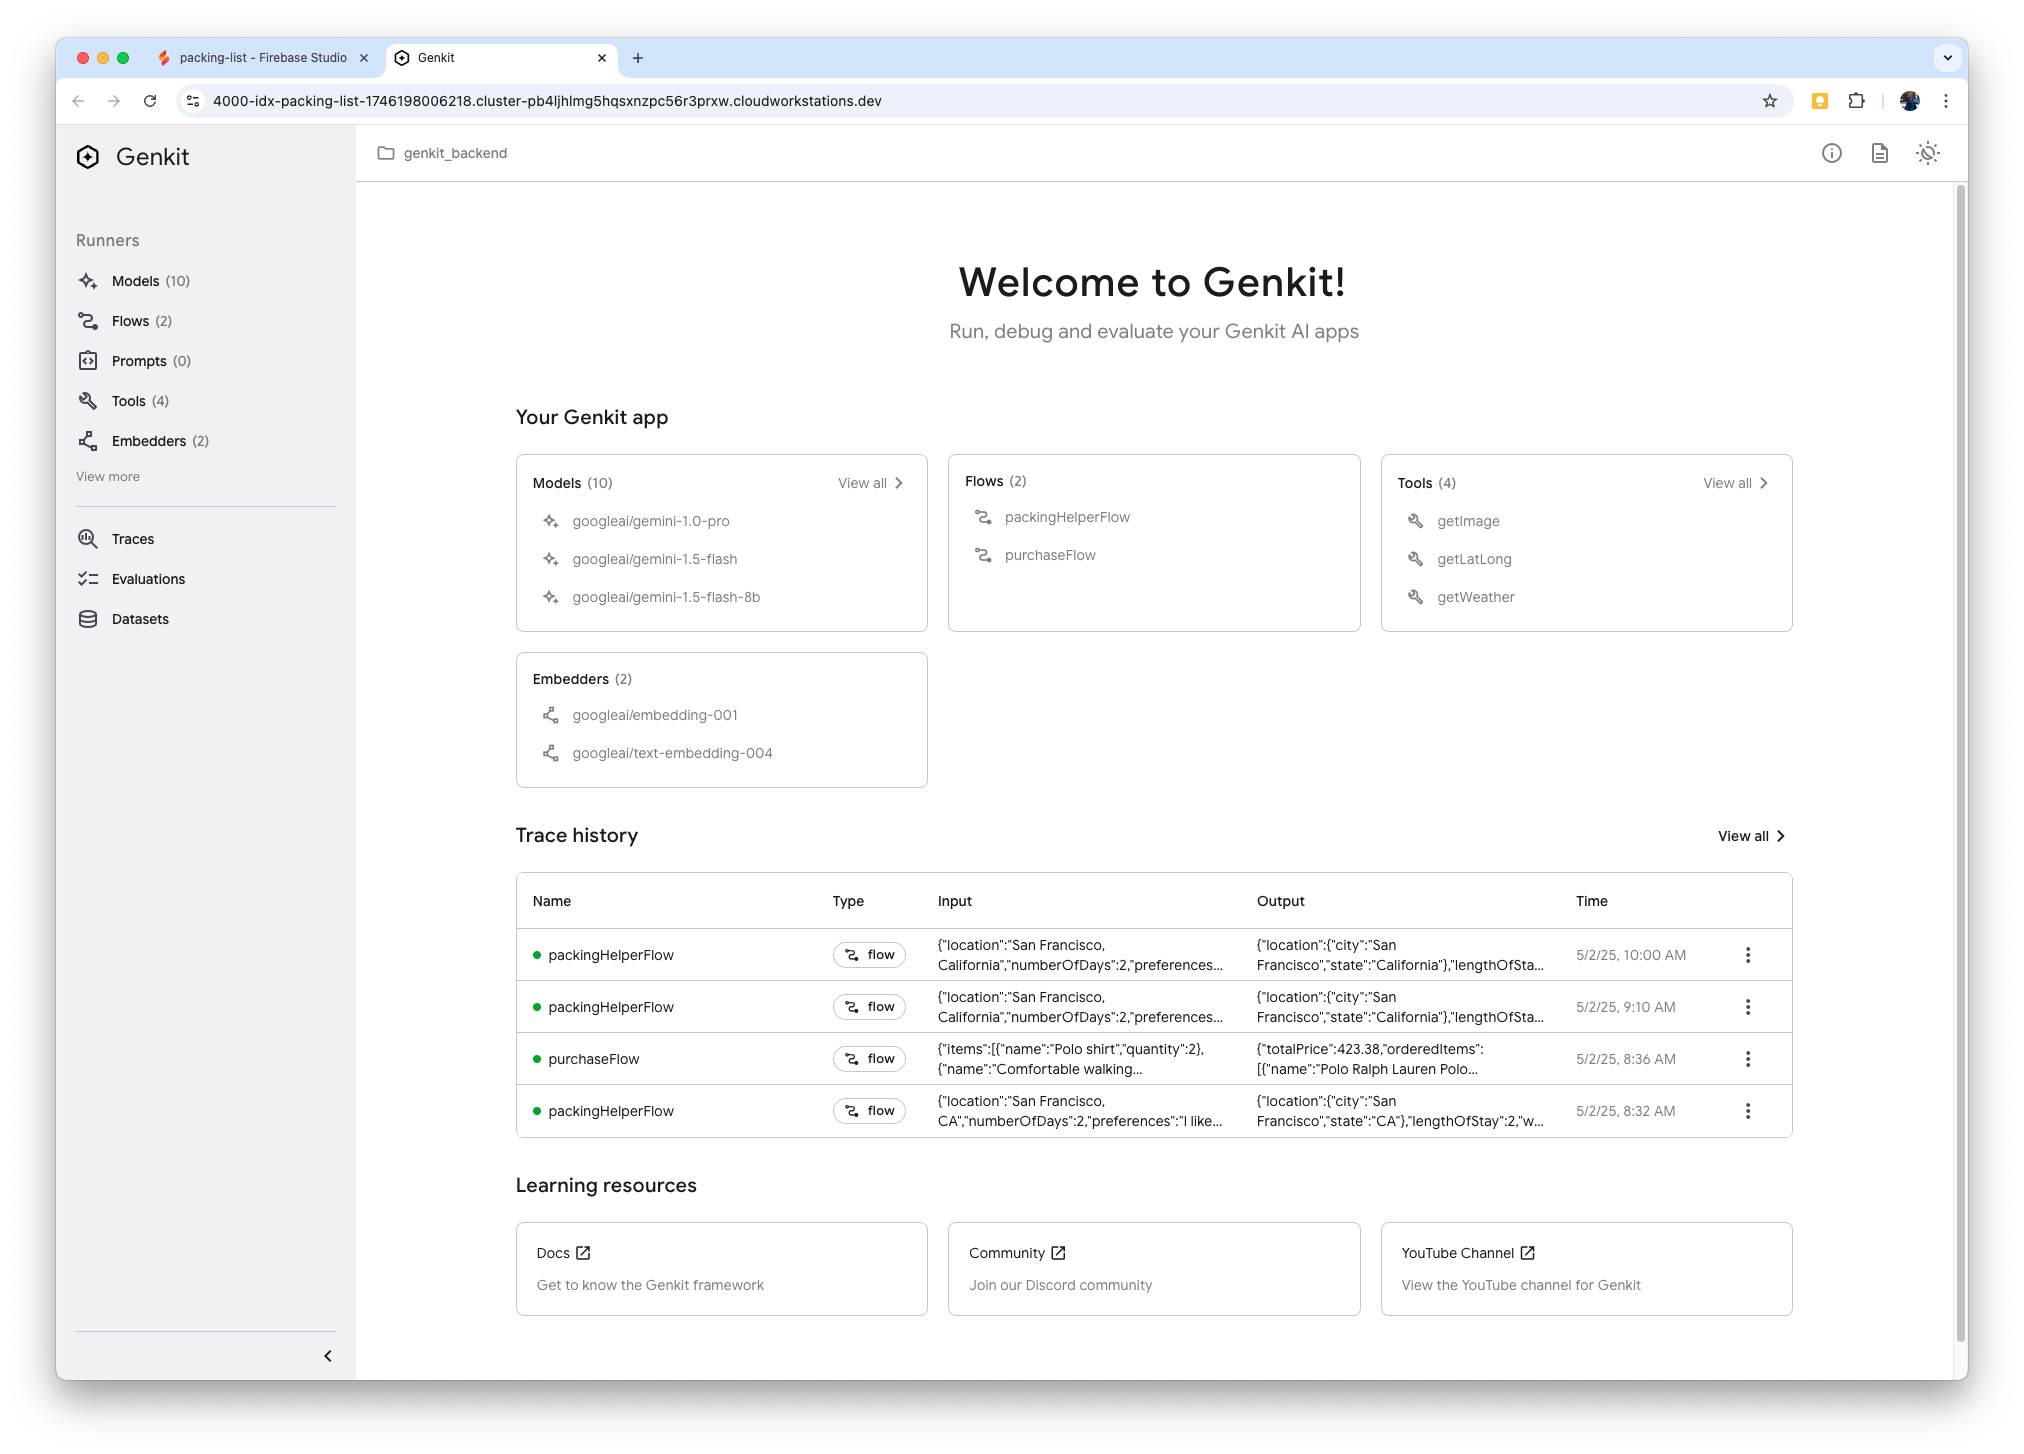
The main dashboard in the Developer UI gives you a summary of your app, what AI models you have available, your flows and the tools that you defined in your code.
Next, you'll see a section called Trace History. This section gives you the actual result of each time you invoke Genkit from the front end. If you ran the app in the previous steps, you should see at least one record for each flow here.
The Trace History
To see what the actual data exchange between the app and the backend, let's click on one of the records. For example, exploring the latest trace for the PackingHelperFlow gives me all the information that I need:
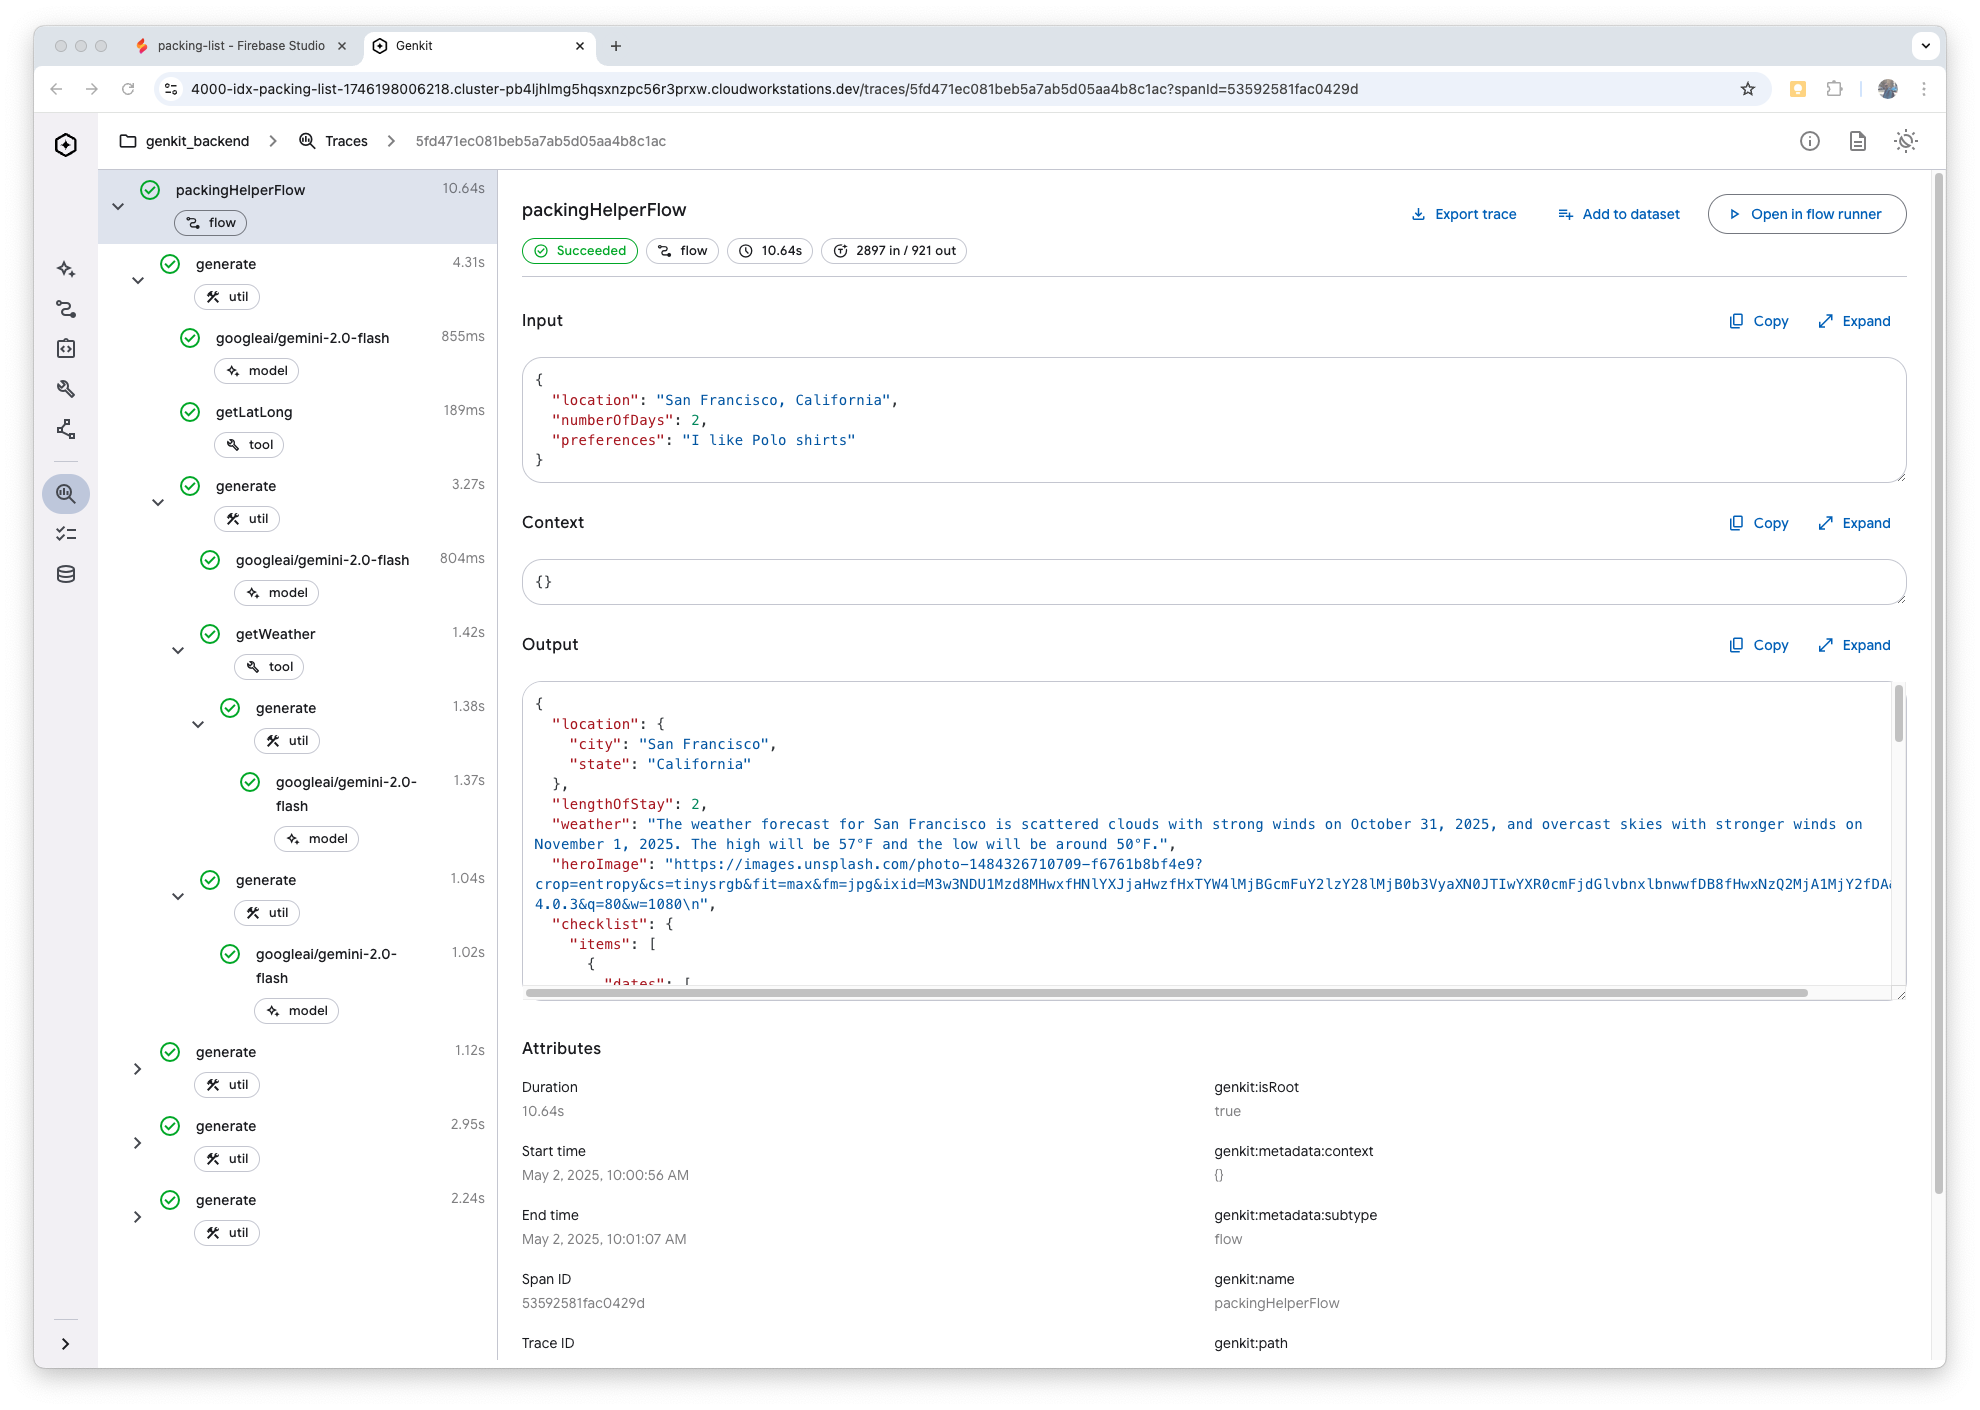
First, on the left side, you see the flow, how each of the steps ran, if they succeeded and what the result was. You can expand or collapse each step to see the utilization of tools and model invocations. In the main part of the screen, you can see the data that the flow received as input, any additional context and the output in json format. You can copy or expand each of the data sections.
Finally, at the bottom of the screen you have some metadata This includes things like the duration of the flow, when it started, where the code lives, etc. This trace history is super useful to keep track of the usage of the Genkit backend and also to see the details of any error that might occur.
The Runners Section
One of the most useful secions of the Genkit Developer UI is the Runners section. Here, you can play around with the models you have available, your tools, and your flows.
The Models Runner
The Models runner allows you to work on your prompt's for individual calls to the LLMs. You can use this interface to fine-tune your system prompt, include context and compare results.
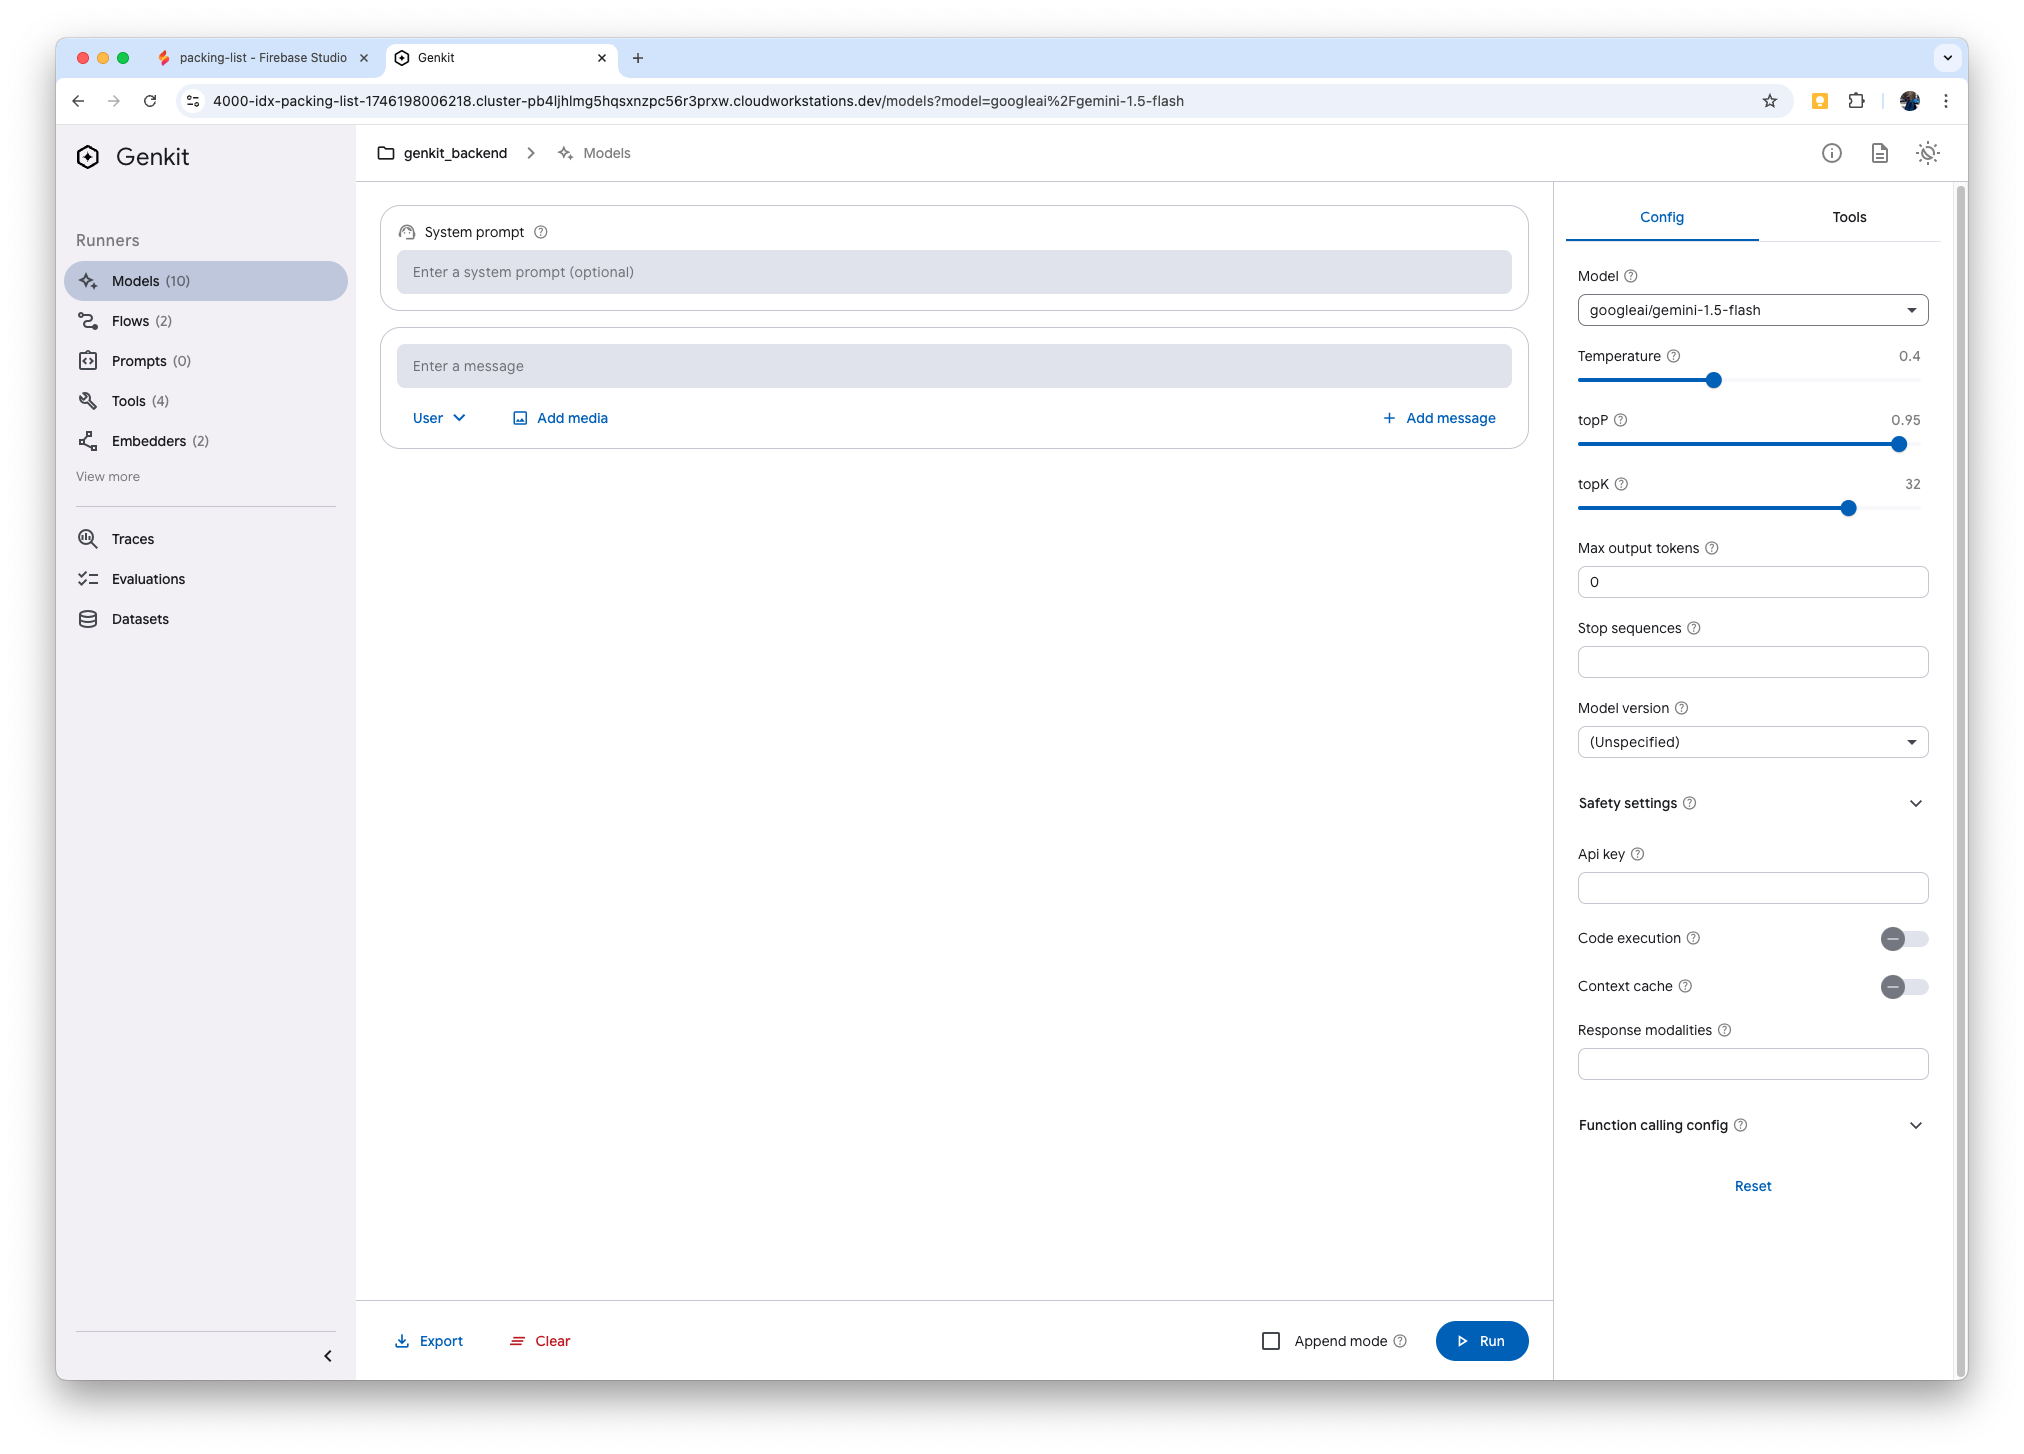
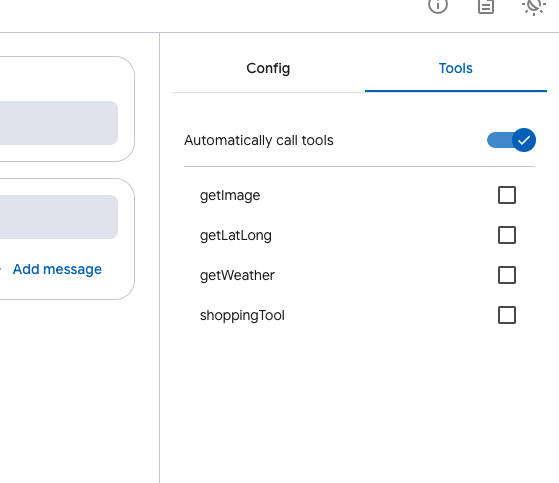
To the right, you can select what model you can work with and tweak all the available parameters. You can even set what tools you want the model to use.
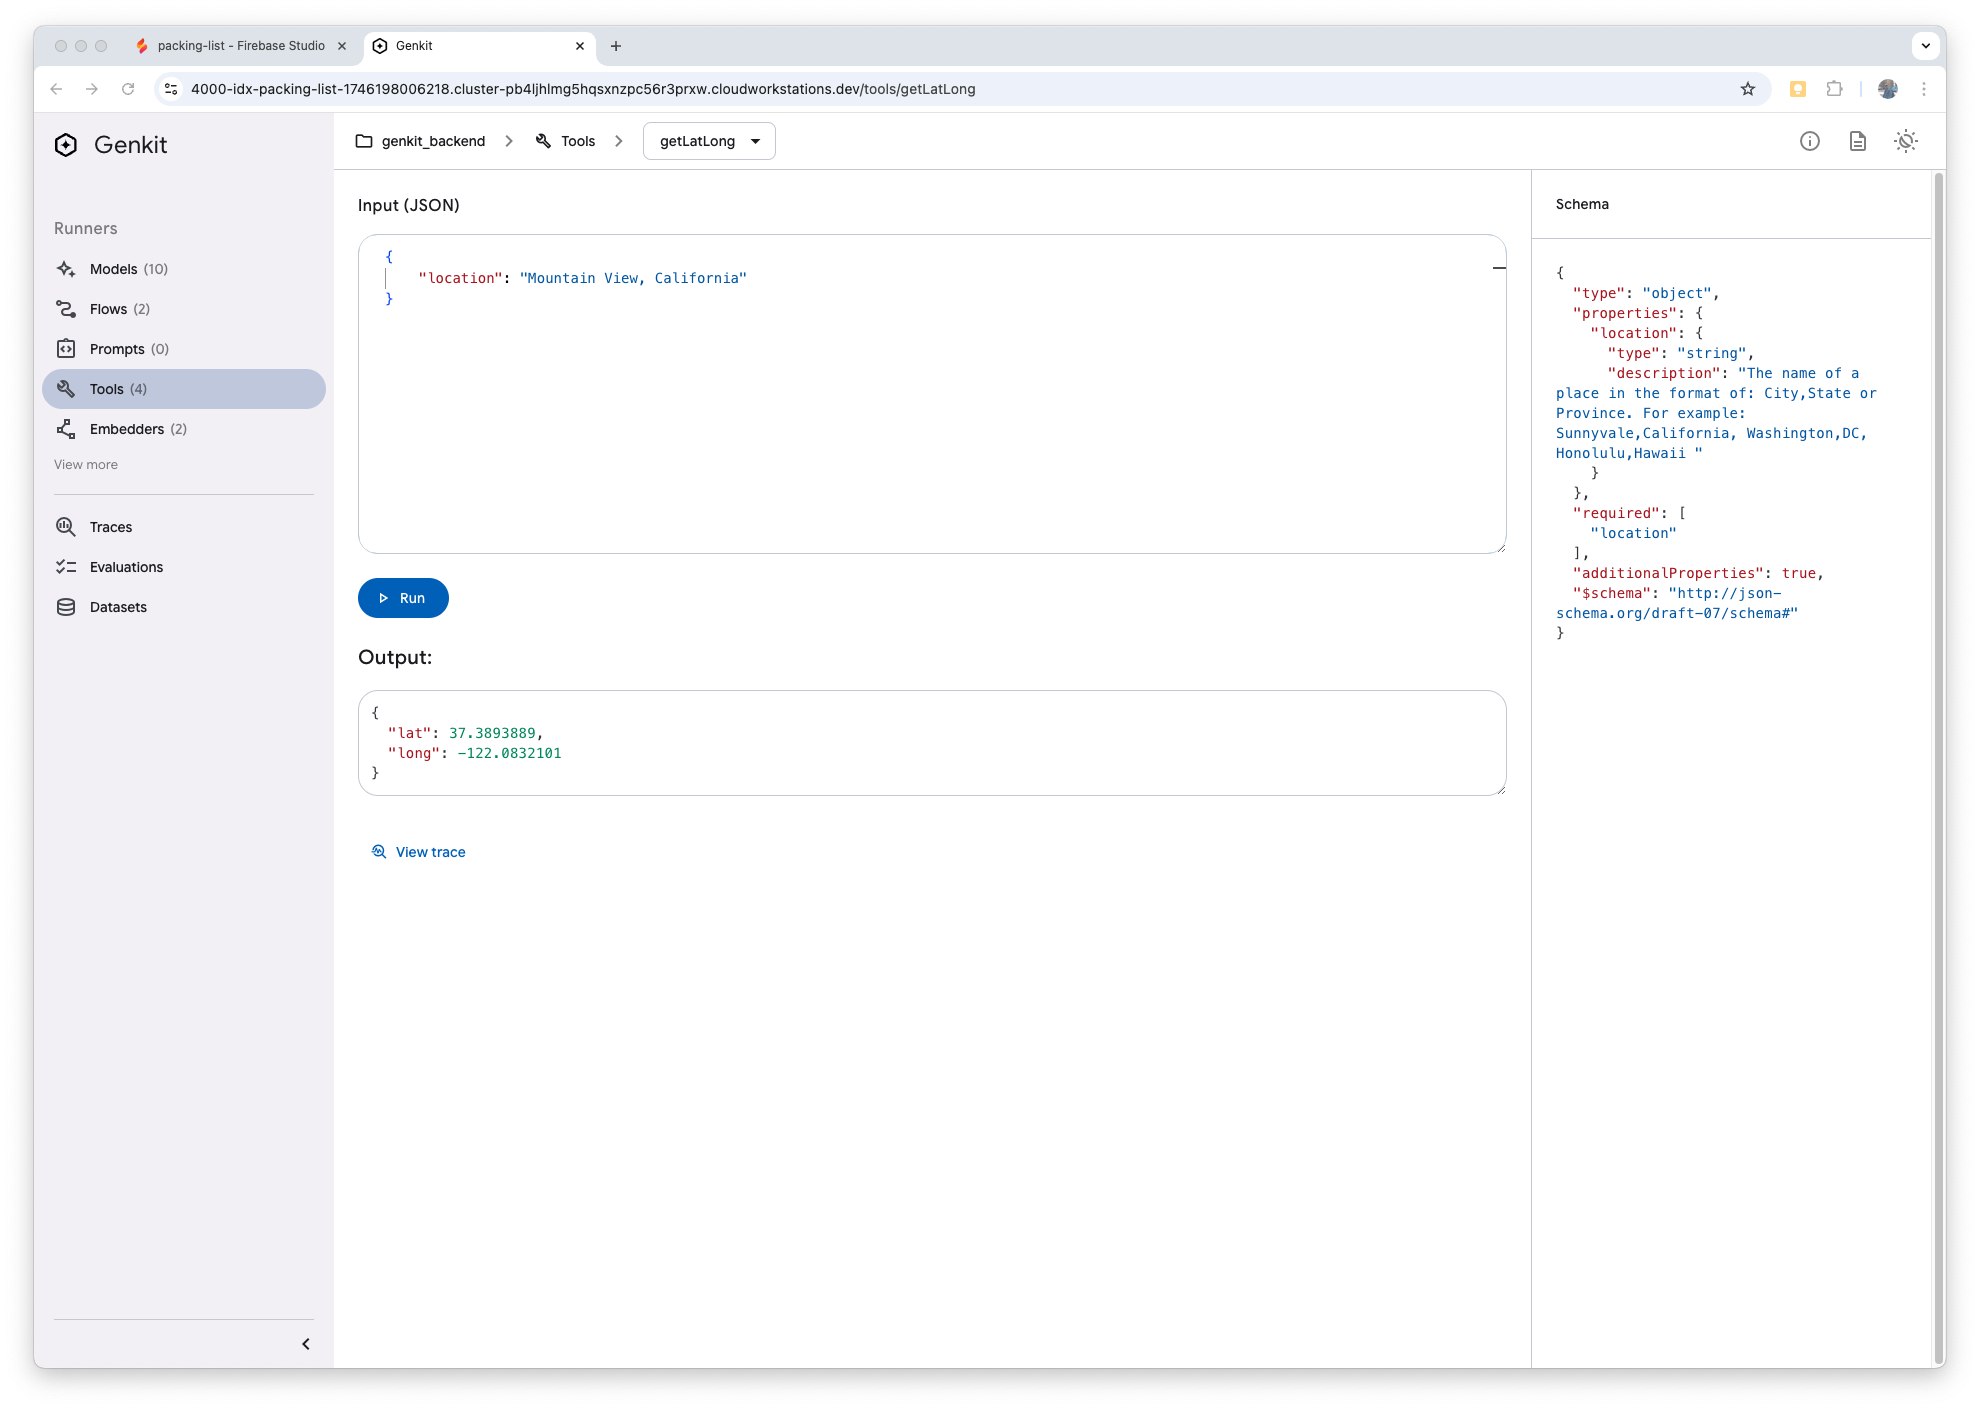
The Tools Runner
When working with agentic workflows, one of the most important aspects is the tool definition. These are the resources that the AI will have available to function correctly and do stuff for our users. In the Tools runner, you can play around with your tools and look at the traces that each call generates.
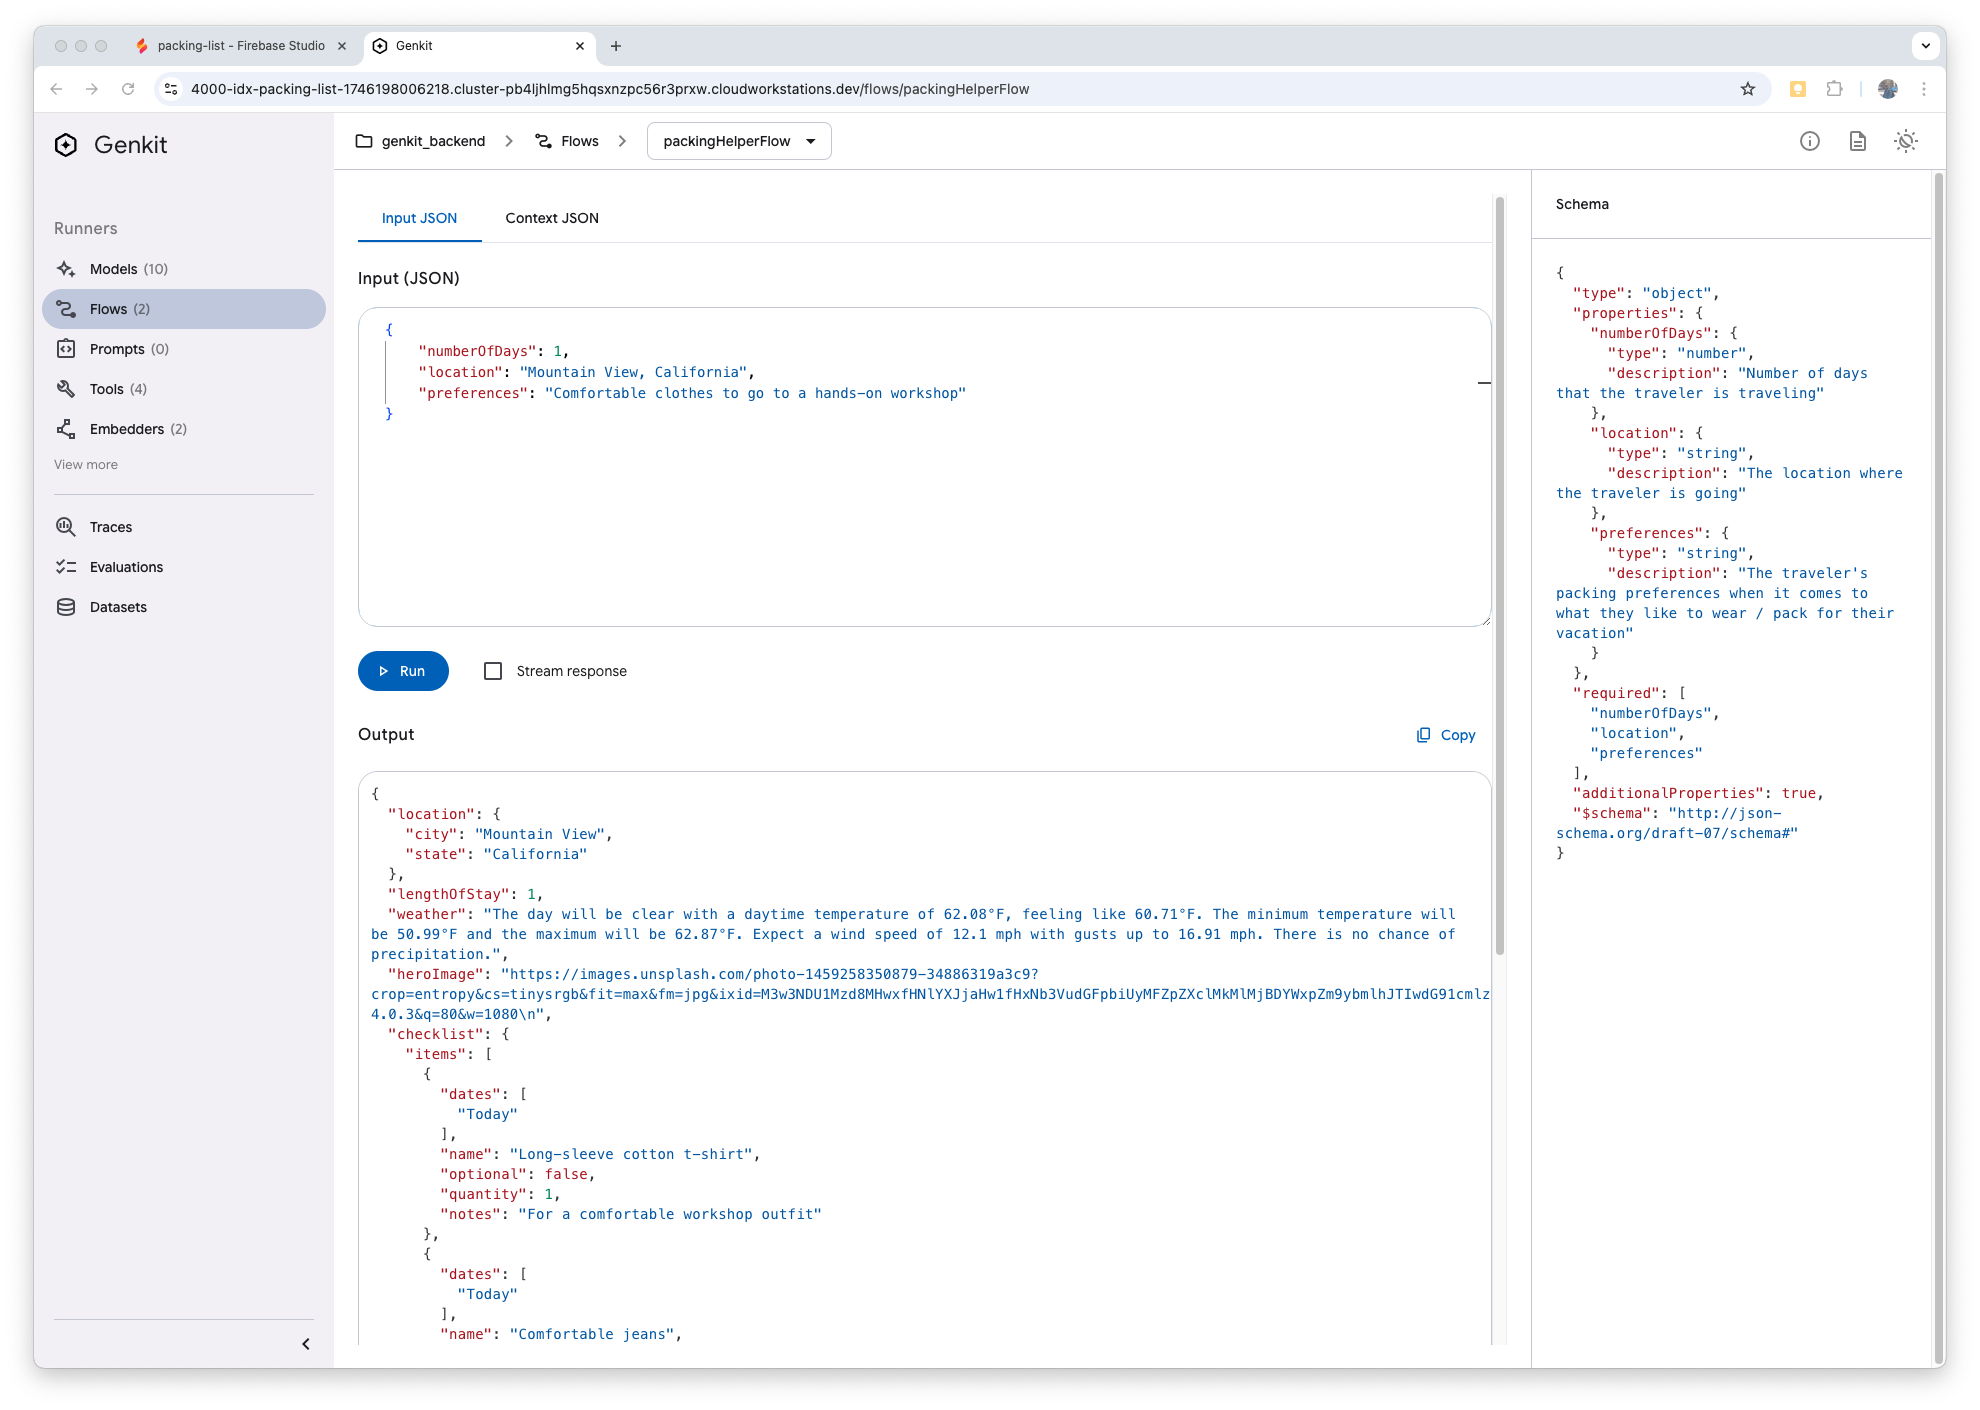
The Flows runner allows you to glue everything together and test end-to-end calls to your backend. You can customize the data that you send and each time you run a flow, a new trace entry will be there for you to explore.

In this workshop, you built a fully functional agentic app using Flutter, Firebase Studio, and Genkit. You learned how to:
- Configure and deploy a full-stack AI-powered application entirely in the cloud.
- Use Genkit to orchestrate multi-step workflows using language models and tools.
- Leverage tools like OpenWeatherMap and Unsplash to extend your app's capabilities.
- Use Firebase Studio as an end-to-end development environment, from code editing to live preview and debugging.
- Explore and debug flows using the Genkit Developer UI.
Agentic apps represent a new paradigm in application design—combining user inputs, real-time data, and AI-driven logic in a seamless experience. With Genkit, you have a powerful abstraction to build sophisticated AI backends without sacrificing flexibility or maintainability.
We hope this hands-on experience inspires you to build your own AI-powered ideas. Modify the Packing List app, create new tools, extend flows, or integrate other APIs. The platform is open and the possibilities are endless.
Happy hacking!